
How to craft a modern vintage baby quilt part 3
EASY DIY BABY QUILT SERIES
Free Beginner Sewing Patchwork Pattern With Easy to Follow Tutorials
Perfect for new quilters and a quick make for the more experienced.
SEWING YOUR QUILT TOP FOR YOUR BABY QUILT
Part #3 in the series
(This post contains some Amazon affiliate links, I will earn a small commission if you purchase at no extra cost to you)

Welcome back to our baby quilt-making journey!
In Part 1, we explored the exciting world of selecting fabrics for your baby quilt.
In Part 2, we cut up our beautiful fabric in preparation for today’s step, sewing them together, or piecing in quilting terms, to make the quilt top.
In Part 3, we'll dive into the heart of quilt-making: Sewing the fabric squares into units, then rows, and joining those rows to form the quilt top.
And remember, making a baby quilt (or fur baby quilt), is a perfect project for all skill levels because they are small and quick to complete.
Take a moment to join my newsletter, this way you never miss a post or a fabric giveaway!
Grab your favorite beverage, put on some soothing music, and let's get those sewing machines humming!
Make a Quilt Design Wall:
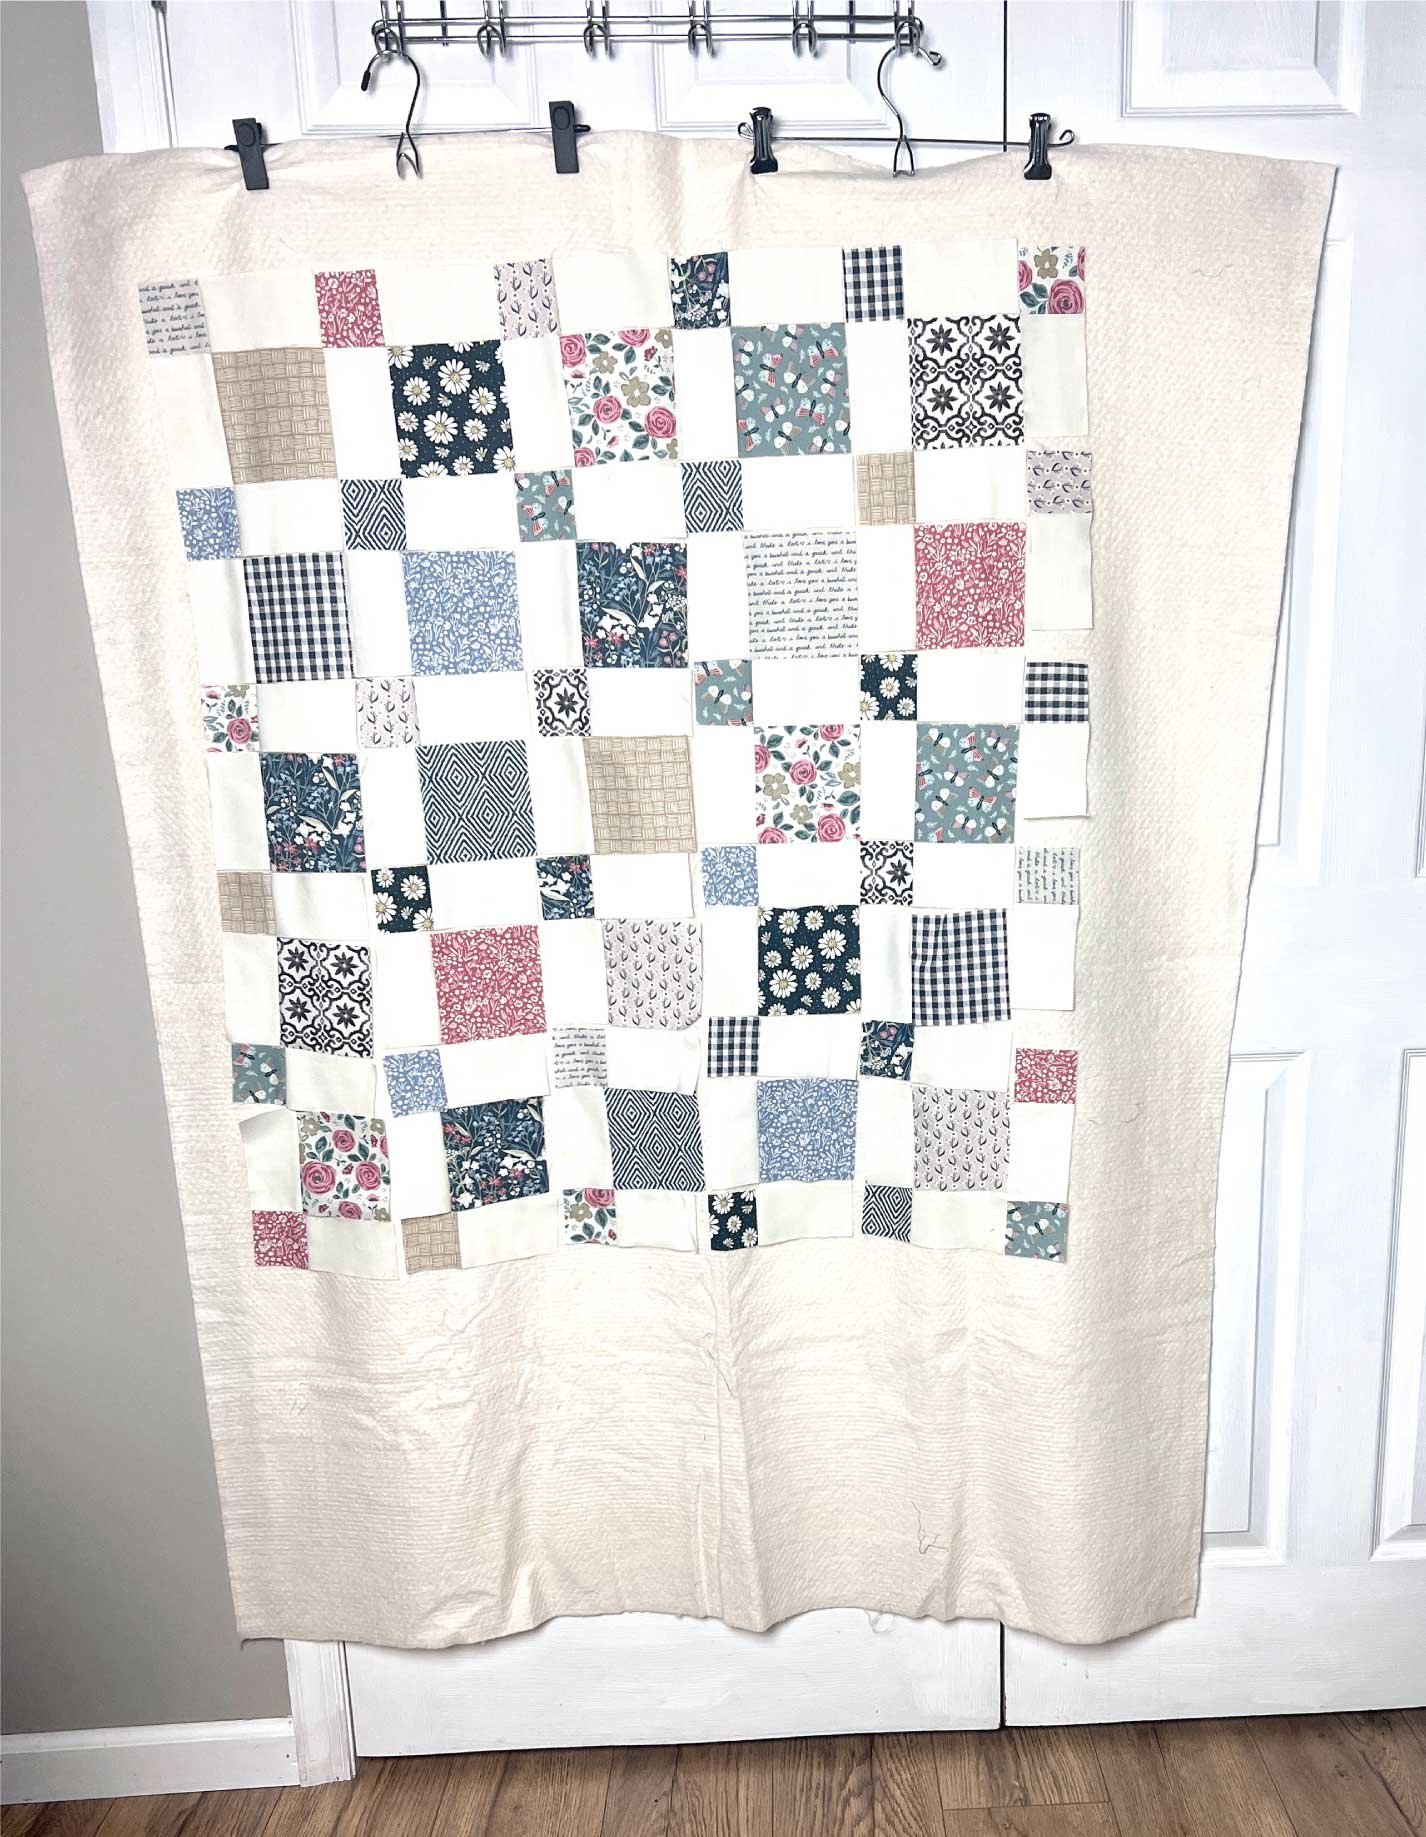
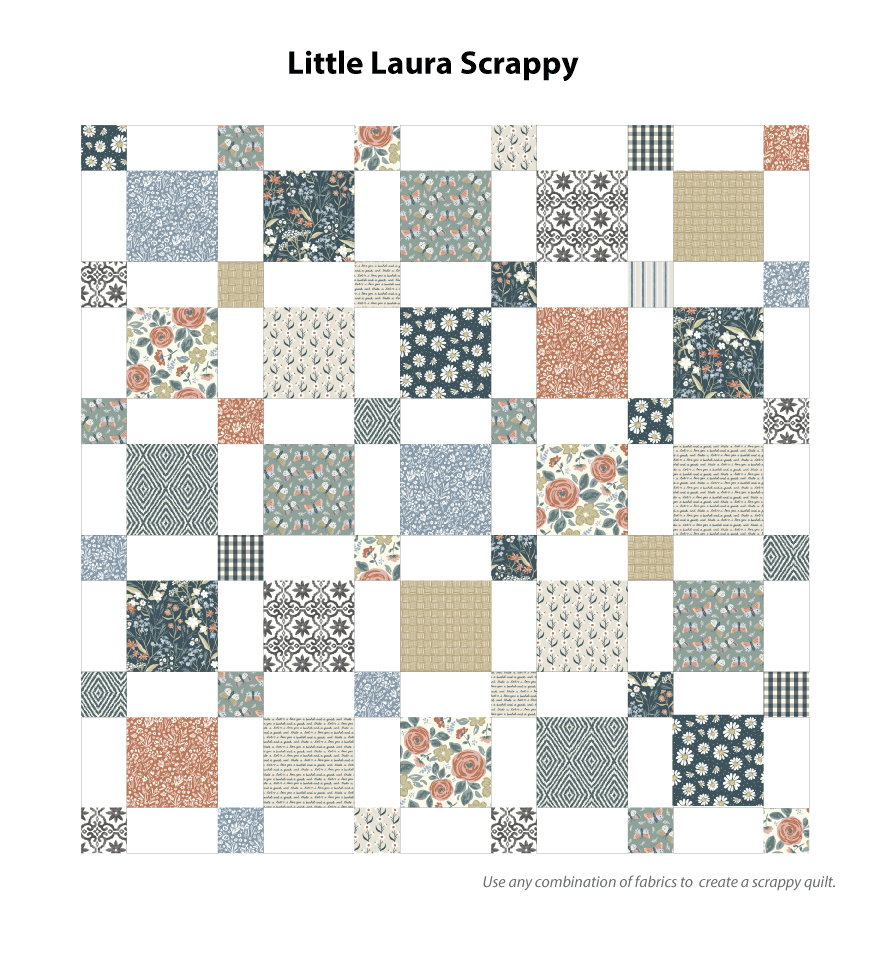
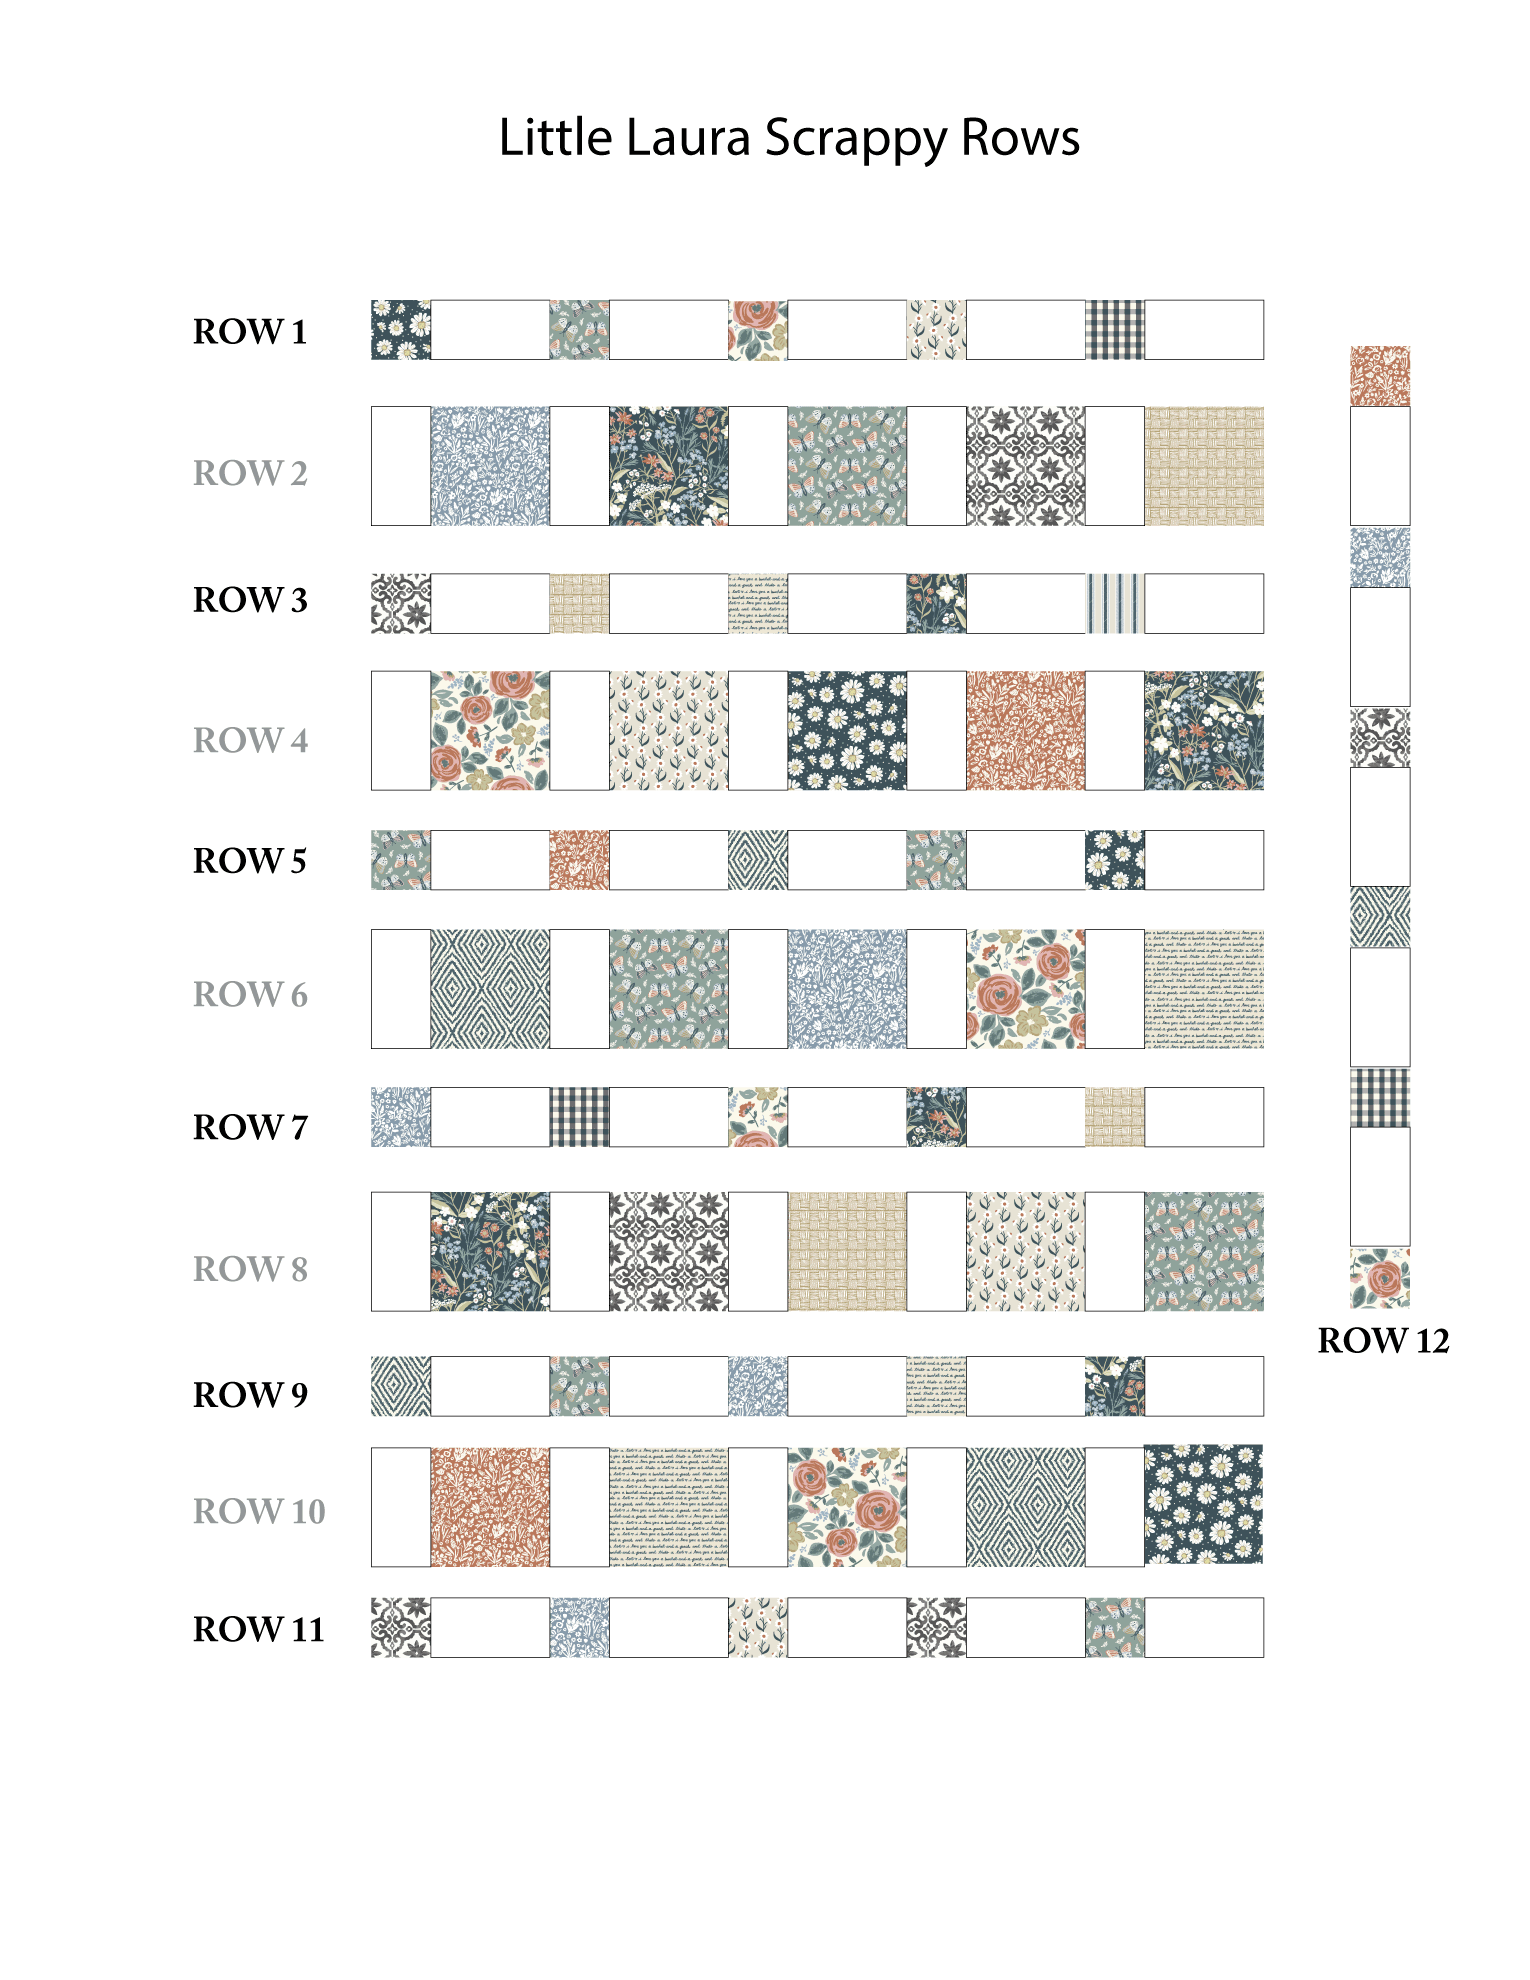
I use a makeshift quilt design wall to lay out all of my fabric. I followed the Little Laura Scrappy quilt chart (see below).
A quilt design wall is just a blank wall where you hang a large piece of flannel fabric or batting. These materials are perfect because quilting cotton seems to stick to it, magically. It helps to prevent sore knees and aching back as you are not kneeling on the floor, or bending over a bed to arrange your quilt squares.
A quilt design wall is very helpful to use as you get a preview of what your finished quilt will look like. You can play with different fabric arrangements, all temporarily while you decide what works best for you.
How to Make a Quilt Design Wall
I use a piece of quilt batting and clothing hangers to temporarily attach the batting to closet doors (see above).
You can also use a flannel backed tablecloth from a discount store. I have seen some quilters use the inside of their garage door to hang their quilt design wall. You just need a space big enough to accommodate your size quilt. Since our quilt is small, you don’t need a lot of space.
Alternatively, you could use a table, or a bed, or the floor.
Suzy Quilts has a lot of great ideas on how to make a more permanent one, you can read it here. It’s on my list to make one one day.
Add Your Fabric to Your Design Wall:
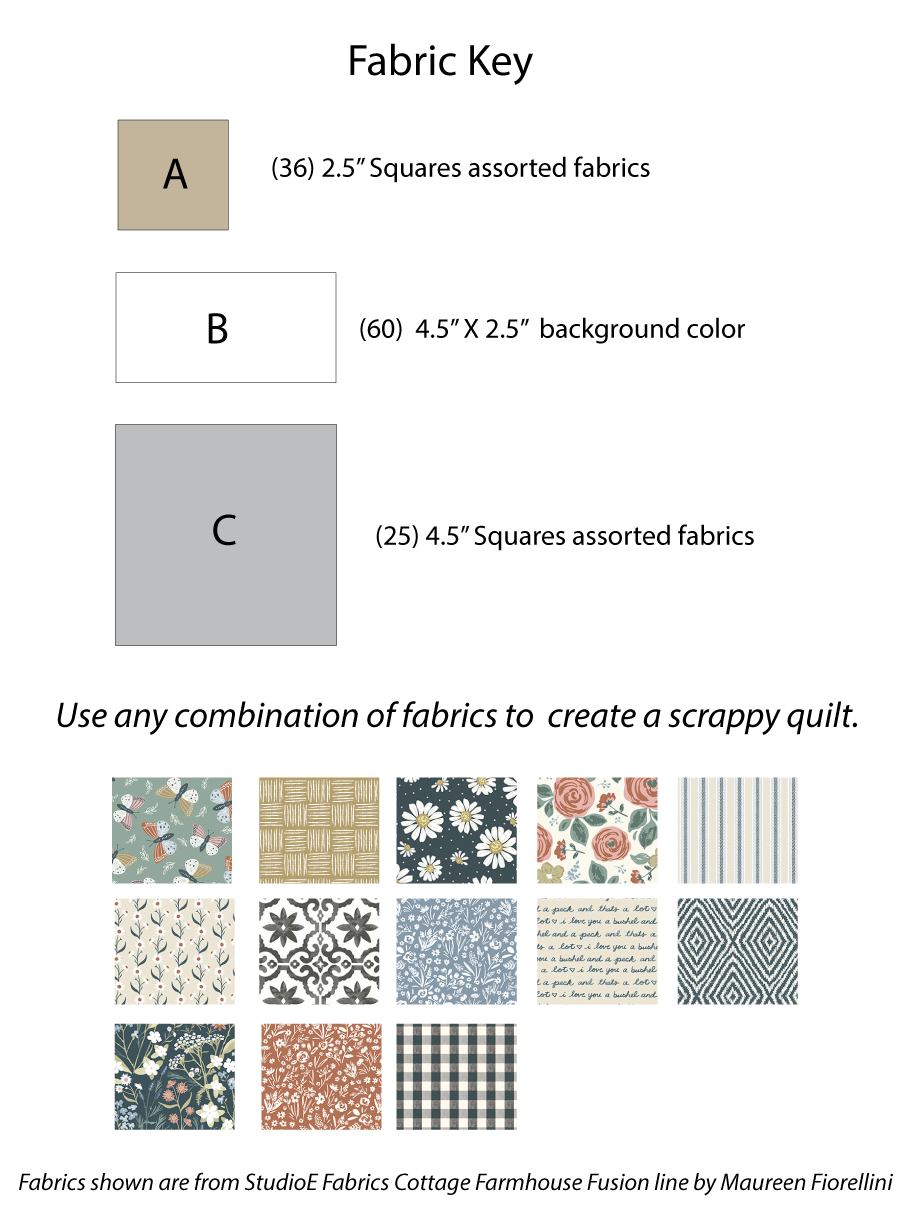
Using the fabric key, layout your cut fabric on your design wall row by row.
Layout all of Your Squares:
Lay out your fabric squares on your design wall following the chart below This is where your creative vision comes to life! Play with colors, patterns, and arrangements until you find the perfect combination.
Step back from time to time and study the overall balance of colors. Keep moving them around until you have an arrangement that you are happy with.
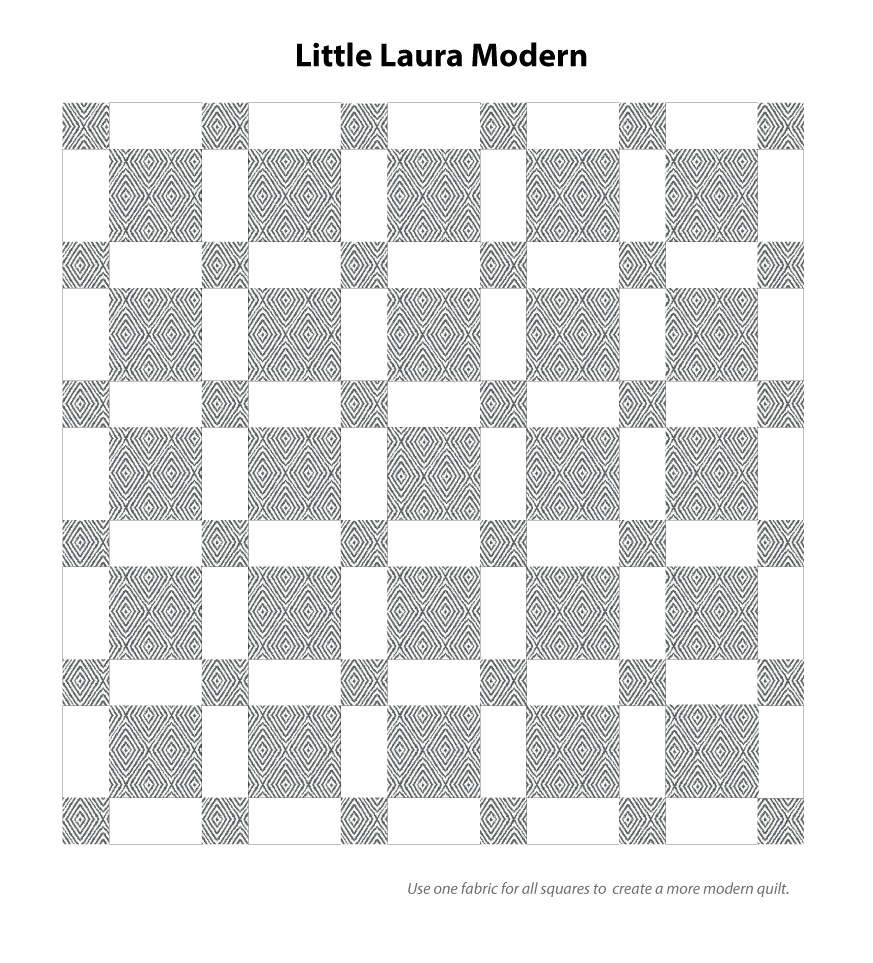
This will be much easier if you went with the modern all one fabric version, no decisions to make.
PRO TIP:
Once you have all of your fabric in place, take a photo. You will refer to this photo so you can put your sewn units back on the design wall in the correct order.
TIME TO SEW, BUT FIRST…
Practice and Perfect Your ¼” Seam Allowance:
I can't stress this enough, mastering a uniform ¼” seam allowance is one of the most important aspects of quilting.
Practice on pieces of scrap fabric until you have mastered this step. Your squares will not line up if your seams are all different sizes.
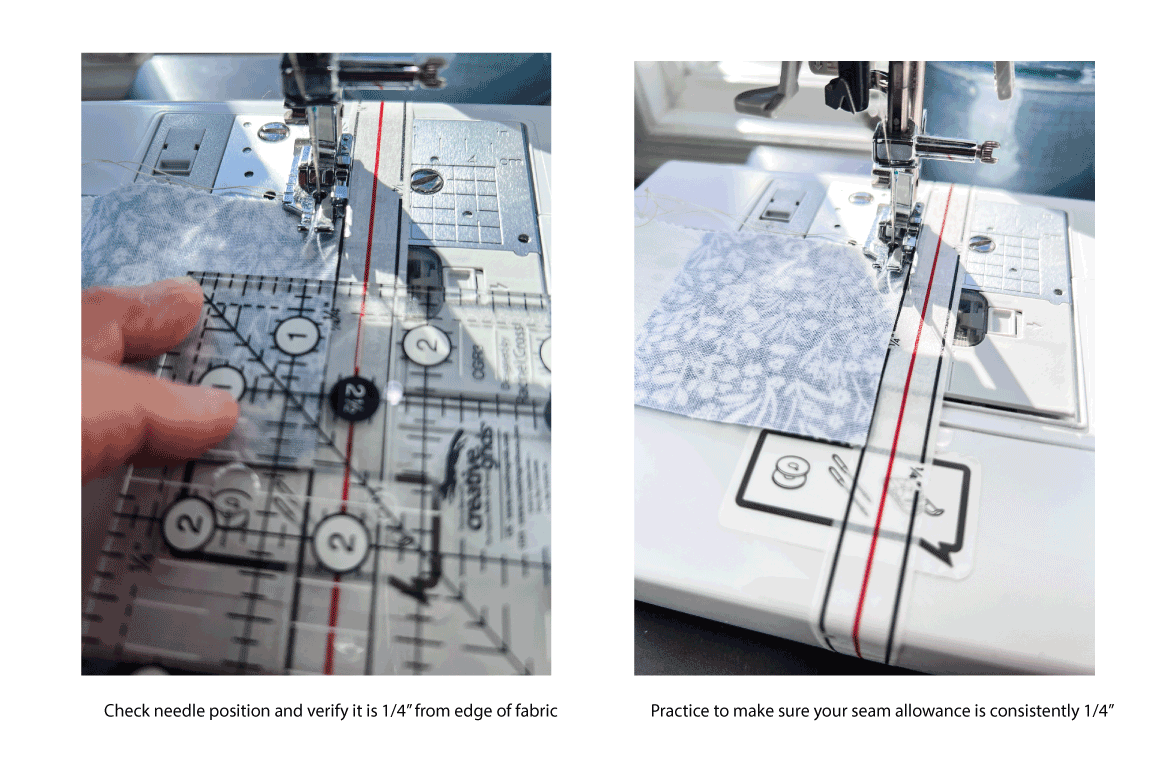
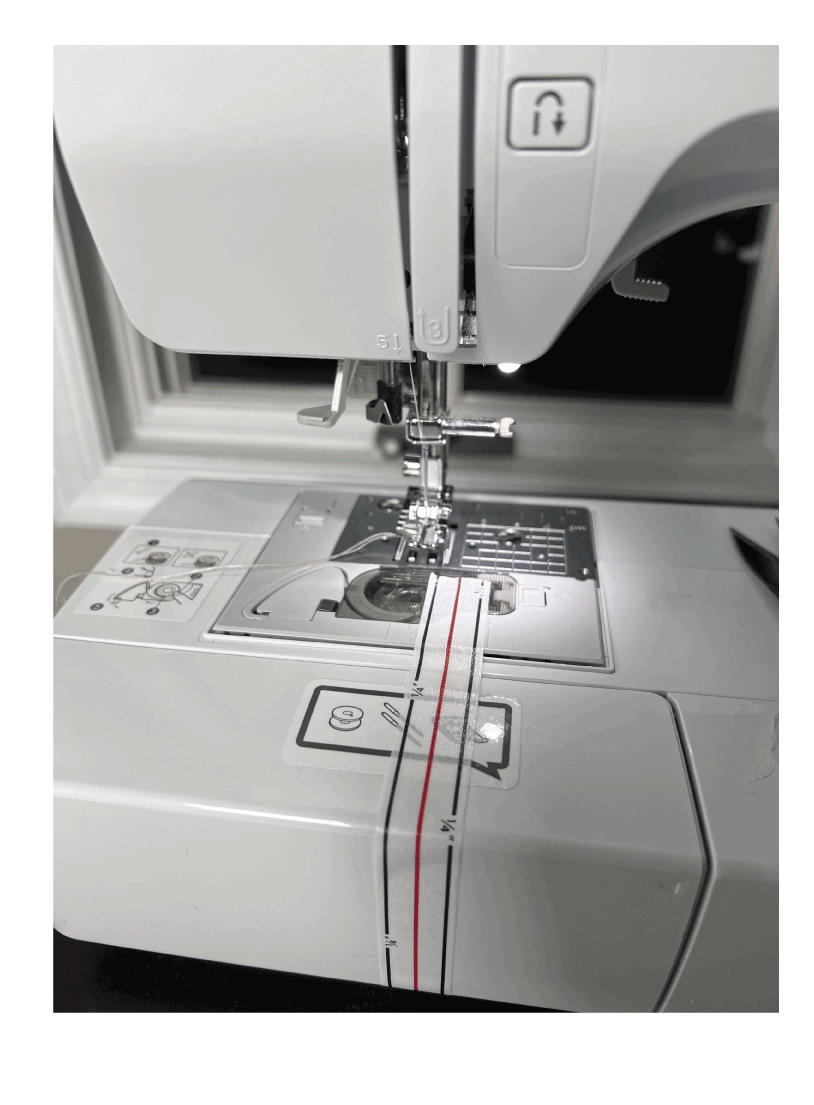
CONSIDER USING TAPE TO GUIDE YOUR SEWING
Some sewing machines come with a specific ¼″ quilter’s foot with a seam allowance marked by the edge of the presser foot being ¼″ away from the needle. But still check, mine was not accurate.
I put a piece of tape on my sewing machine as a guide once I figured out the position on my machine.
This is the tape I use on my machine.
WHAT THREAD TO USE?
(For quilting, I like to use Aurifil and Gutterman brand thread. Both in 50wt. 100% cotton.)
For all of my sewing supply recommendations, read this post.
Preview of the Quilt Rows
This baby quilt is comprised of 12 rows sewn together.
I numbered the rows for easy referencing, so you can keep track, label them as you go.
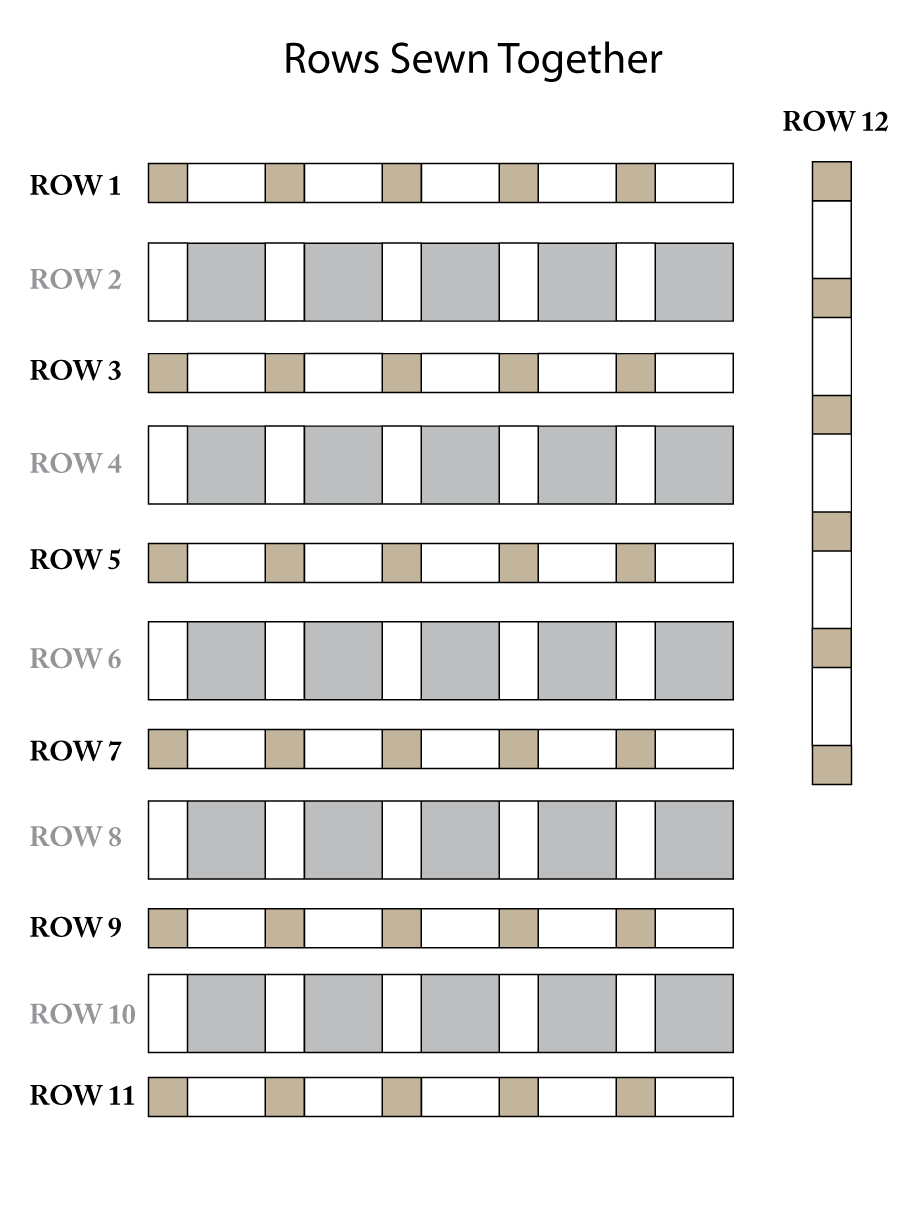
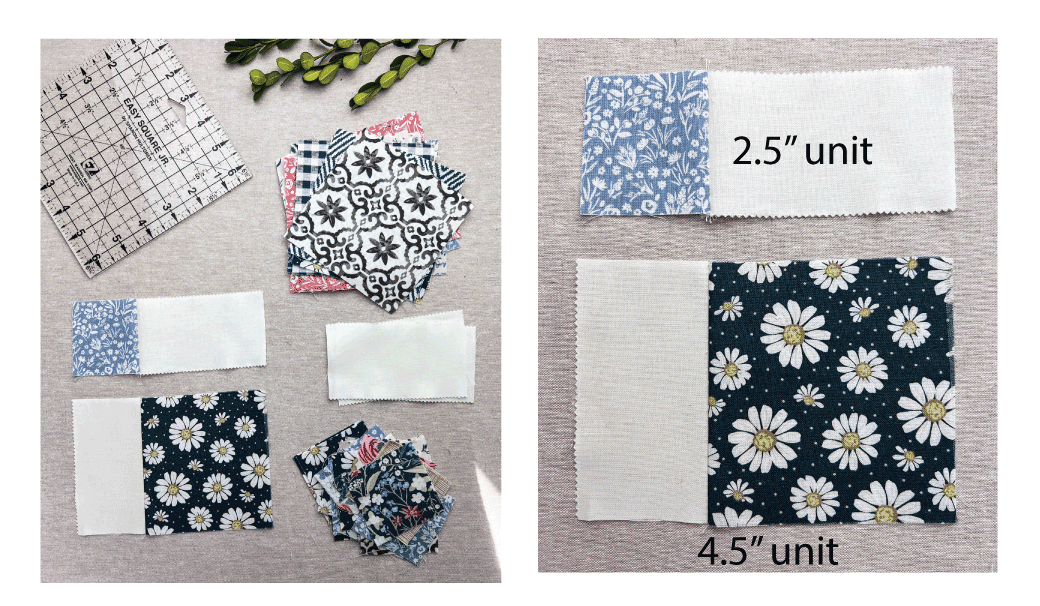
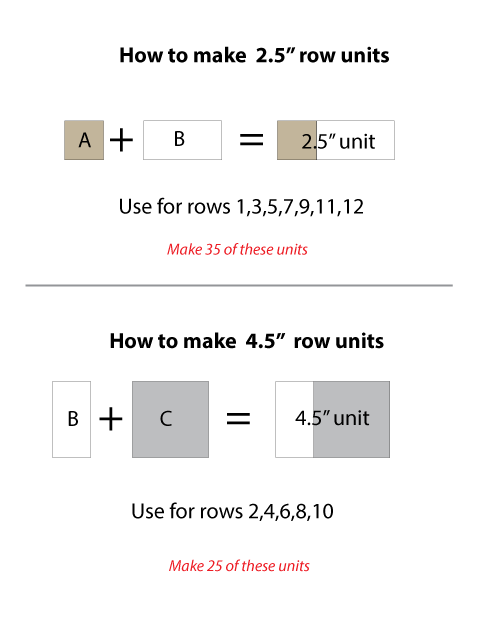
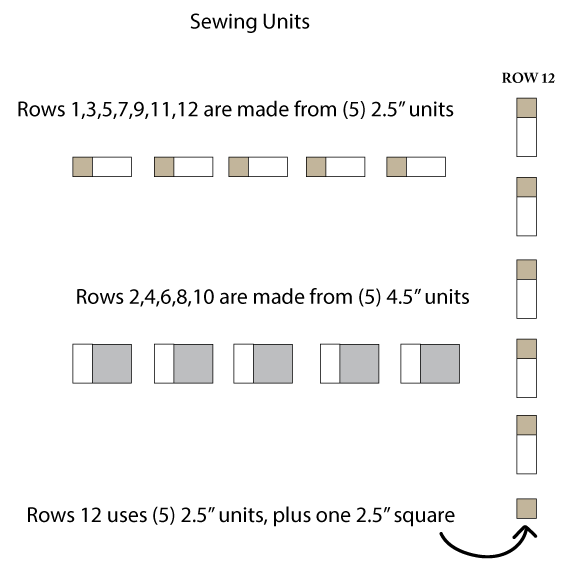
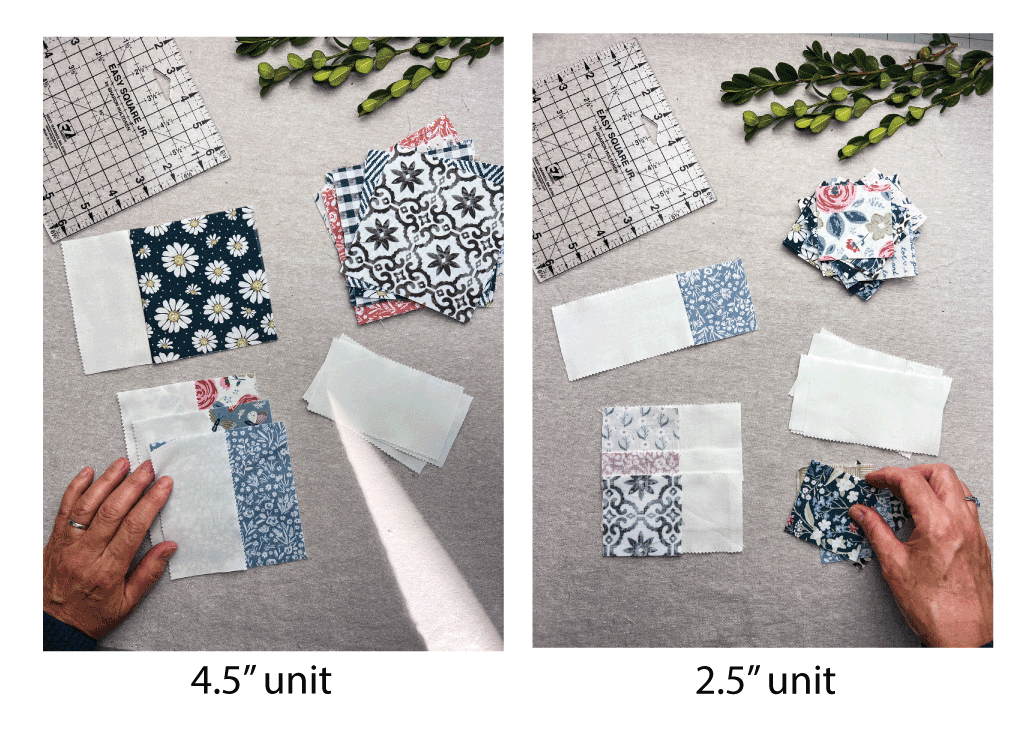
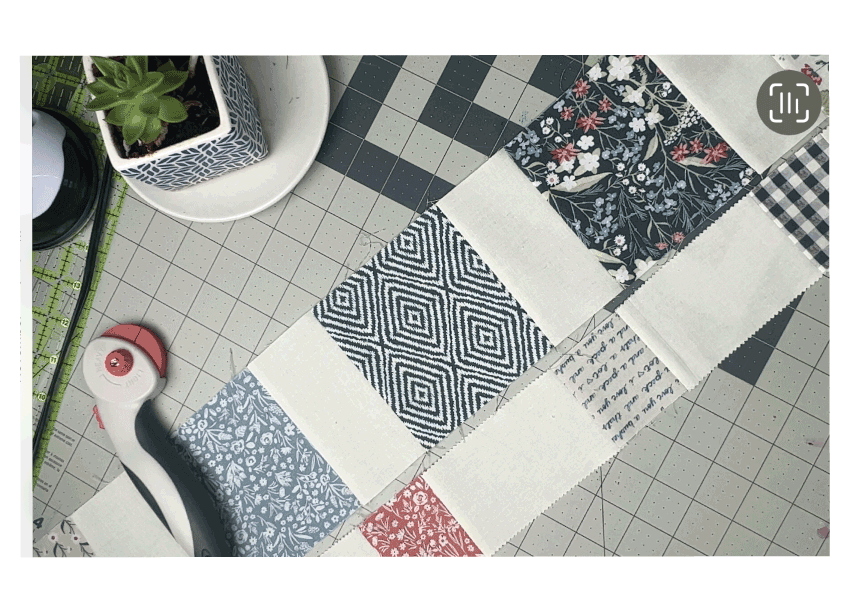
Sewing Units Together
Before sewing each row, it is easier to sew “units” together. Follow the charts and sew all your units together, then sew the rows together.
PRO TIP:
Don’t forget to check your seam allowance every now and then to make sure you are still consistently 1/4”.
Chain Piecing Magic:
Increase your efficiency by chain piecing the squares. Sew them together in a continuous chain without cutting the thread between squares. It's like a quilting dance—fluid and fun!
It is easier if your machine is near your quilt design wall. You will sew together units, then put them back up on the wall.
It takes a little practice to master this. Have your chart or photo handy so you can keep your squares in order after sewing.
You can sew together units for each row, then sew the units together to form the finished row. Or, you can sew all of the units first, then sew each row together. Do what works best for you.
I learned how to chain piece from Brittany in this post.
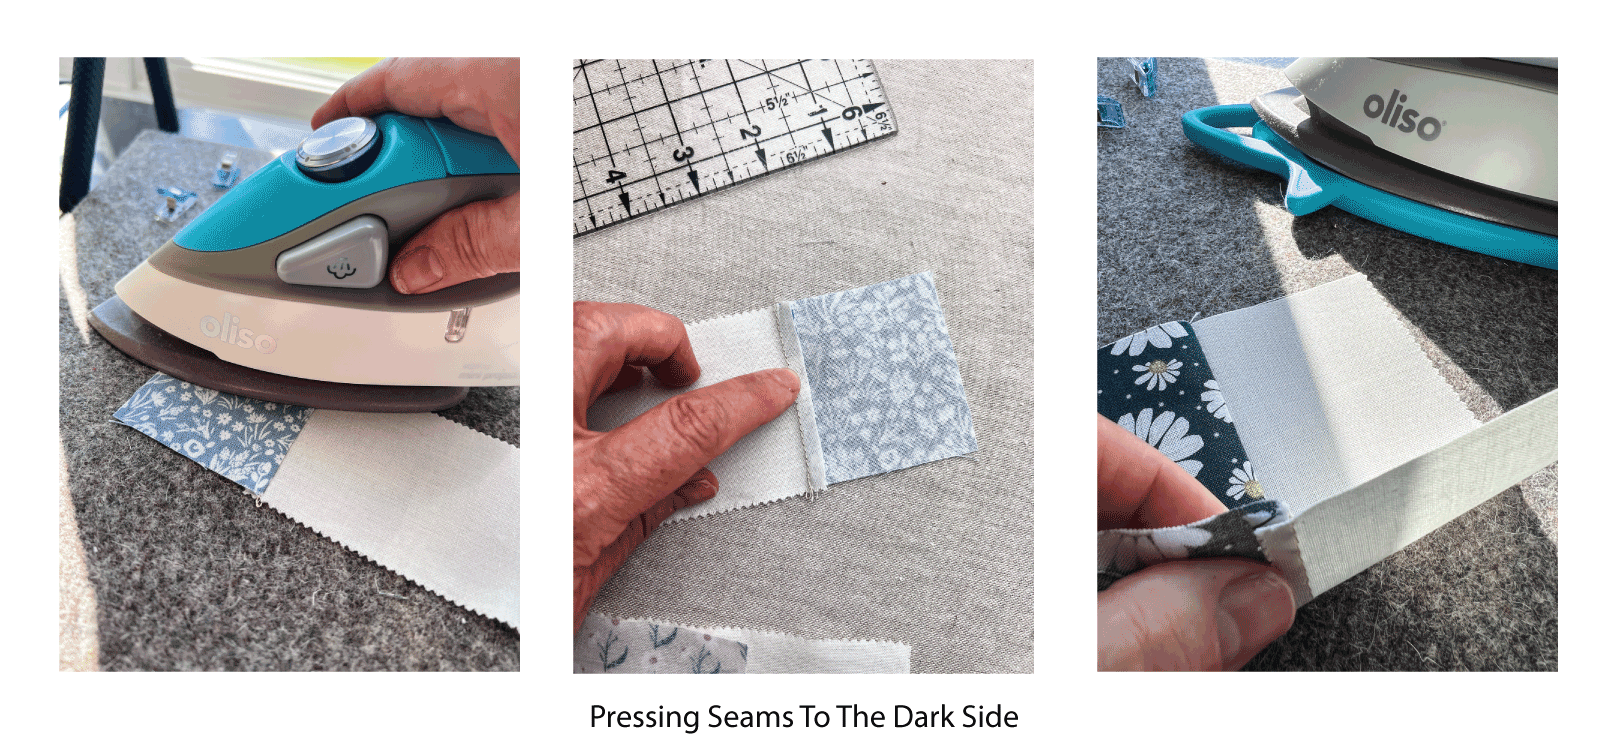
Press as You Go:
Press each seam as you sew. Press the seams to the dark side (saying that always makes me laugh), whichever fabric is darker so it won’t show through to the front of the finished quilt. This not only ensures a polished look but also makes joining the rows a breeze.
I keep my Oliso mini iron near my sewing machine, perfect to press as I go, and I love my wool pressing mat.
Bring your finished units back to your design wall so you are organized and don’t lose track of your rows.
Joining the Rows to Create the Quilt Top:
Lay Out Your Rows: Arrange your rows in the final order, ensuring your pattern flows seamlessly. Step back and admire your work—it's like putting together a beautiful mosaic!
Nesting Seams for Precision: When joining rows, nest the seams together. This is done by pressing the seams in each row in the opposite direction of the row that it will be sewn to. This creates a snug fit and helps maintain the pattern continuity. Precision pays off in quilt-making! (For example, row one seams will all be pressed to the right, row 2 seams will all be pressed to the left.)
Stitch, Stitch, Stitch: Carefully stitch the rows together matching the seams. Take your time, and enjoy the rhythmic hum of the sewing machine—it's therapeutic!
Press Again: Once your rows are joined, give the entire quilt top a good press. Don’t drag your iron over the quilt top, that is ironing and will distort your quilt top. Just lift the iron up and down and move it across your quilt top to flatten the seams. This final touch enhances the overall appearance and sets the stage for the next steps in our quilting adventure.
If some of your seams do not line up, you can go back and see where your seam allowance was off. You can either use a seam ripper and fix it, or proceed and know that in time your accuracy will improve. I am starting to fix my mistakes, but in my first few projects I just kept going. You do you.
I think for your first project, it is more important to finish it, than to be perfect. Perfection is overrated in my opinion, but don’t ask the quilt police🤣.
Your baby quilt top should look something like this :
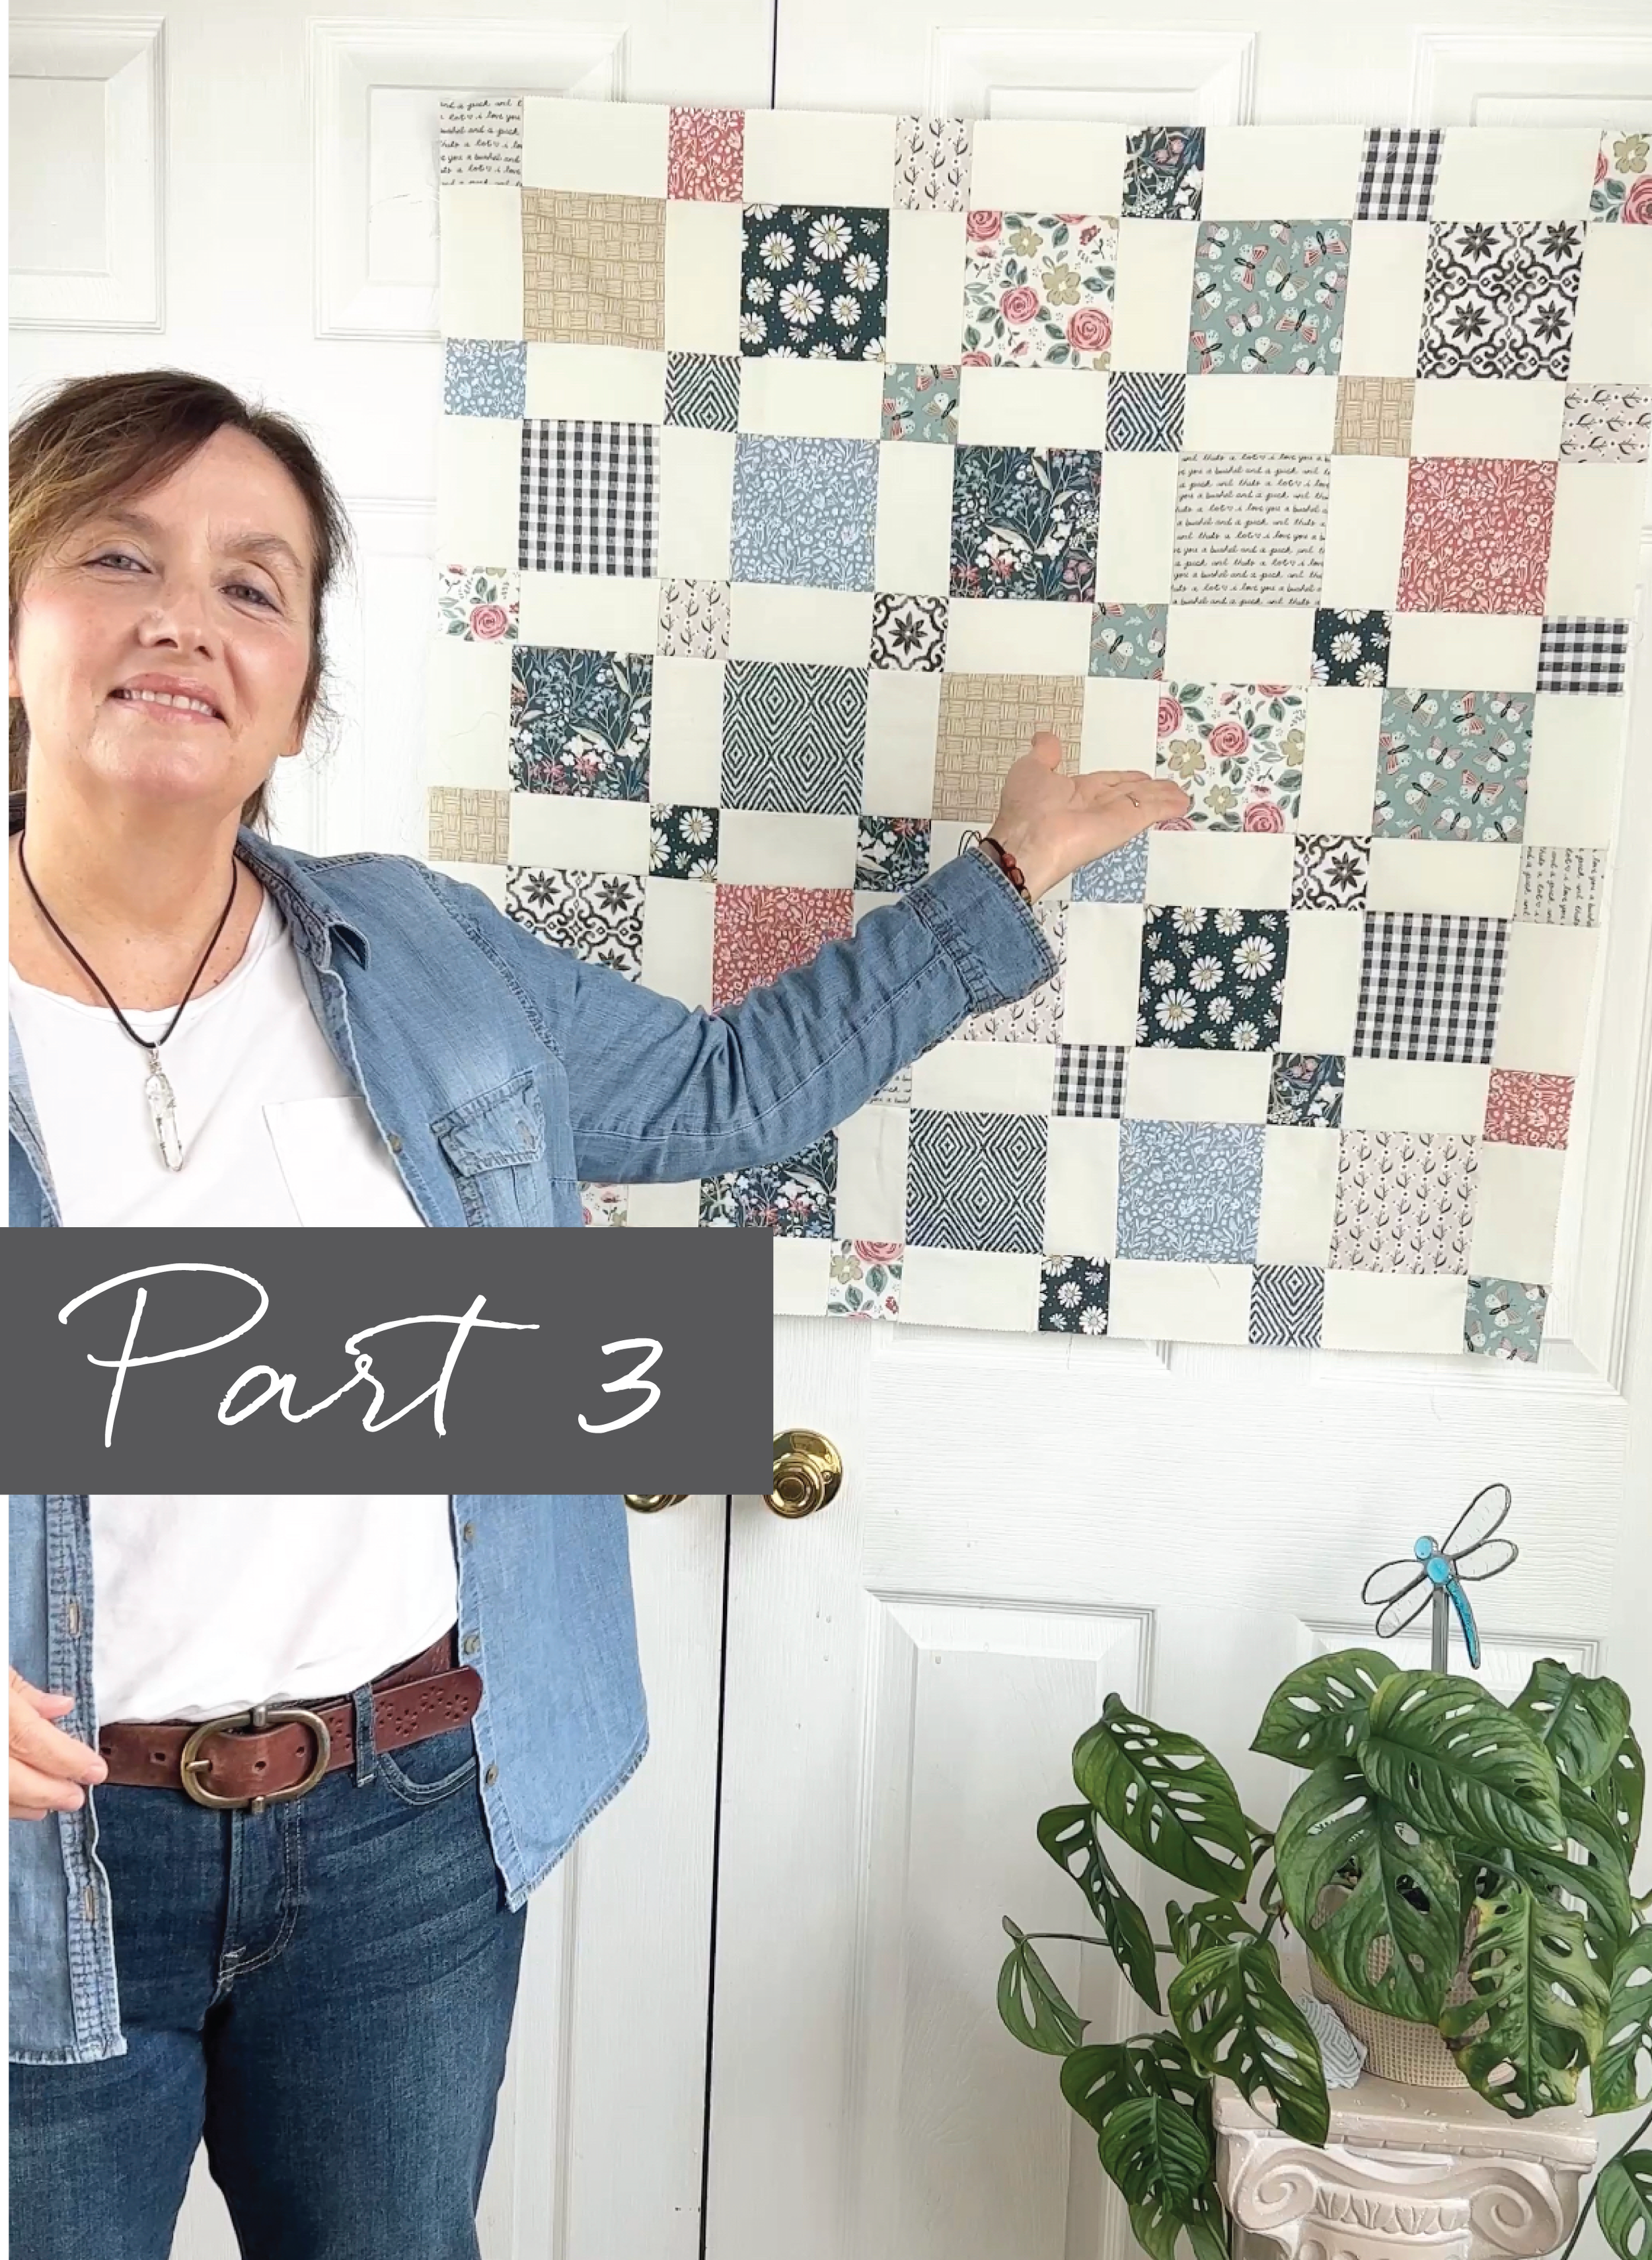
You Deserve a Break!
Yay you! A completed quilt top is quite an accomplishment.
I know you are probably anxious to finish this baby.
In Part 4, I’ll wrap it all up and show you how to make a quilt sandwich, sew the layers together and finally add binding to your quilt.
Thank you for joining me on this quilt-making journey! Your dedication to creating something handmade and heartwarming is truly inspiring.
Comment below and tell me your favorite part of the process so far.
My favorite part is in part 4. See you there.
XO Maureen
PS. If you like sewing for littles, then you might also like my very easy Baby Burp Cloth Tutorial. They would make such a nice gift together with this quilt you are making.
And if you have a fur baby at home (or know someone who has one), I think you should check out my most popular tutorial here.
If you made it this far, kudos to you! Here is a recap of the Baby Quilt series and quick links to take you directly to each stage👍🏻
Quick links to all of the blog posts in the series:
In Part 1, we explored the exciting world of selecting fabrics for your baby quilt.
Part 2: We'll dive into the essential steps of cutting fabric to bring your cozy creation to life.
Part 4: We’ll assemble the quilt sandwich and get ready to hand stitch the layers together.
Part 5: We will hand quilt the layers together, then add make and add the binding.
Part 6: We added optiopnal lace to the binding.
Part 7: Bonus queen size fabric requirements for the more adventurous.