
How to craft a modern vintage baby quilt part 5
EASY DIY BABY QUILT SERIES
Free Beginner Sewing Patchwork Pattern With Easy to Follow Tutorials
Perfect for new quilters and a quick make for the more experienced.
HAND STITCHING AND ADDING BINDING YOUR BABY QUILT
Part #5 in the series
(This post contains some affiliate links, I will earn a small commission if you purchase at no extra cost to you. Thanks for supporting my small business! )

Stitching the Love: The Finishing Touch to Your Baby Quilt
Hello Quilting Enthusiasts!
Welcome back to our baby quilt-making journey!
Congratulations!
We've journeyed through the excitement of choosing fabrics, the precision of cutting squares, the joy of sewing rows, and the warmth of assembling the quilt sandwich.
You can catch up below if you missed any of the steps:
Take a moment to appreciate the progress you've made.
Now, in the final leg of our baby quilt adventure, we'll explore the art of quilting and binding—adding that perfect frame to your masterpiece.
Choosing the Right Binding:
Coordinate or Contrast: Decide whether you want your binding to blend in seamlessly with your quilt or stand out as a contrasting frame. Both options can create stunning effects!
Fabric Selection: Use the same quilting cotton you used for your quilt for your binding, to ensure durability. Many quilters opt for a solid color that complements the quilt top or a small-scale print that doesn't overpower the design.
I chose the solid off white, same as I used in my quilt. I felt a solid was in order, since the quilt was busy. It was from a Moda 2.5” jelyroll, so super fast to make into binding.
This is my favorite part, hand quilting the quilt sandwich and attaching the binding.
Let’s get this baby finished!
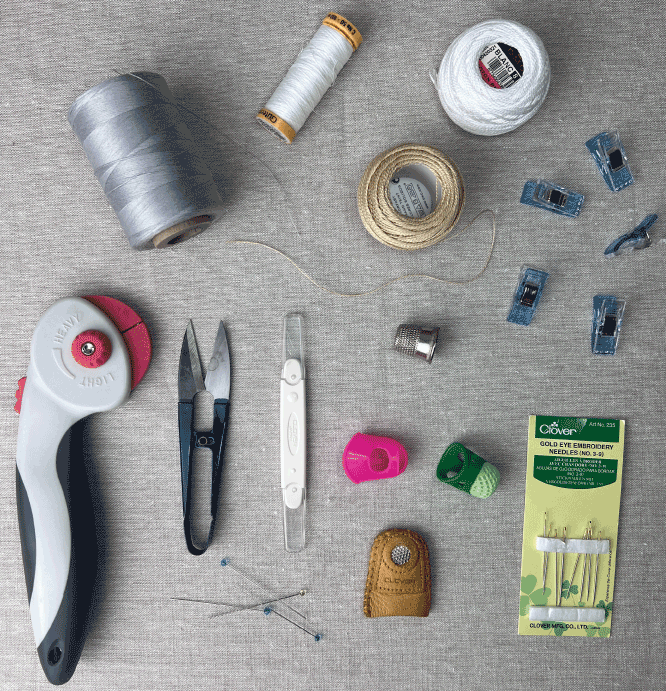
SUPPLIES FOR HAND QUILTING YOUR QUILT SANDWICH
Thimble of choice( try them all, I prefer the Clover leather one pictured here, I use a size medium but it slips off sometimes, I will get a small next time.
DMC Pearl Cotton No. 8 Thread, in ivory. (So many fun colors to choose from, try a contrasting color for a change, it adds a unique character to the quilt)
12.5” square quilting ruler (or biggest one you have)
24” long ruler (or biggest one you have)
Cutting mat, get the biggest one you can afford. Mine is hard to find, it’s 36” x 36” Friskar’s brand. This is similar but smaller:
Sewing machine. I highly recommend this shop if you are in the market to purchase a high quality sewing machine.
Sewing machine needle (This is just in case you decide to machine quilt the sandwich, if your machine is struggling, try changing to a 90/14 machine needle, better for thicker material)
Sewing machine thread (100% cotton, I like Gutermann and Aurifil brands, the cones are greater value if you sew a lot) I have found light grey, white and off white all work on most quilts.
I hope you enjoy this part of the project. I suggest you put some music, podcast or audio book on and enjoy the process.
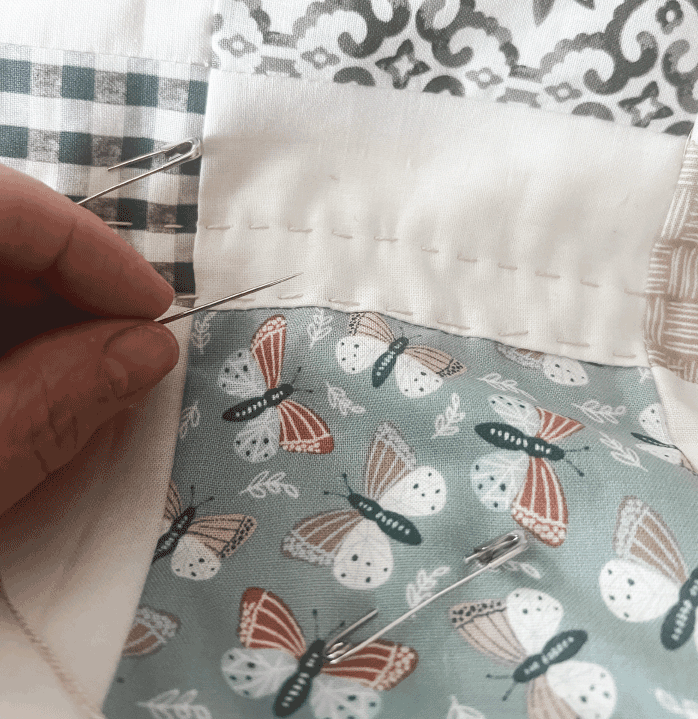
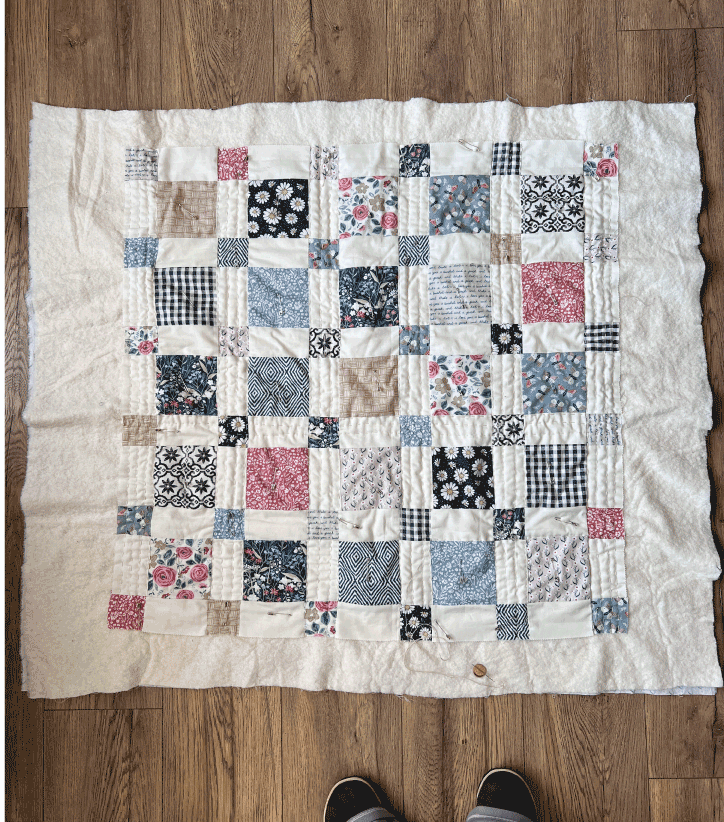
Ensure you have the quilt top, batting, and backing securely pinned or spray basted together. Thread your needle and tie a secure knot at the end of the thread. Quilters like to use a special “quilters knot”, just twist the thread 2 or 3 times times before pulling the knot through the loop)
Begin quilting in the center of the quilt and work your way outward. This prevents wrinkles and ensures an even distribution of stitches. Select a simple quilting design that complements your quilt's style. I went with straight lines and marked them with my hera tool, as shown in part 4 blog post.
Pro Tip:
Keep the safety pins in, unless they get in the way of your stitches. You can remove them when you are done. You want to prevent the layers from shifting as much as possible.
Practice, Practice
Grab the quilt with one hand from underneath and pretend it is an oven mit, this will give you greater control of the quilt and avoid it bunching up.
Practice Your Stitches: Use a rocking motion to create small, even stitches. Aim for consistency in stitch length and spacing. This will take practice, you will get better over time. Use your thimble to push the needle through.
Rotate the Quilt: Periodically rotate the quilt to make stitching more manageable. Continue quilting until the entire quilt is covered.

If you are a visual learner, like me, this video should help, sorry but my dog wanted to do the voice over🤣:
Aim for consistency, don’t worry about perfection, this is after all a handmade quilt. Your stitches will get more uniform over time.
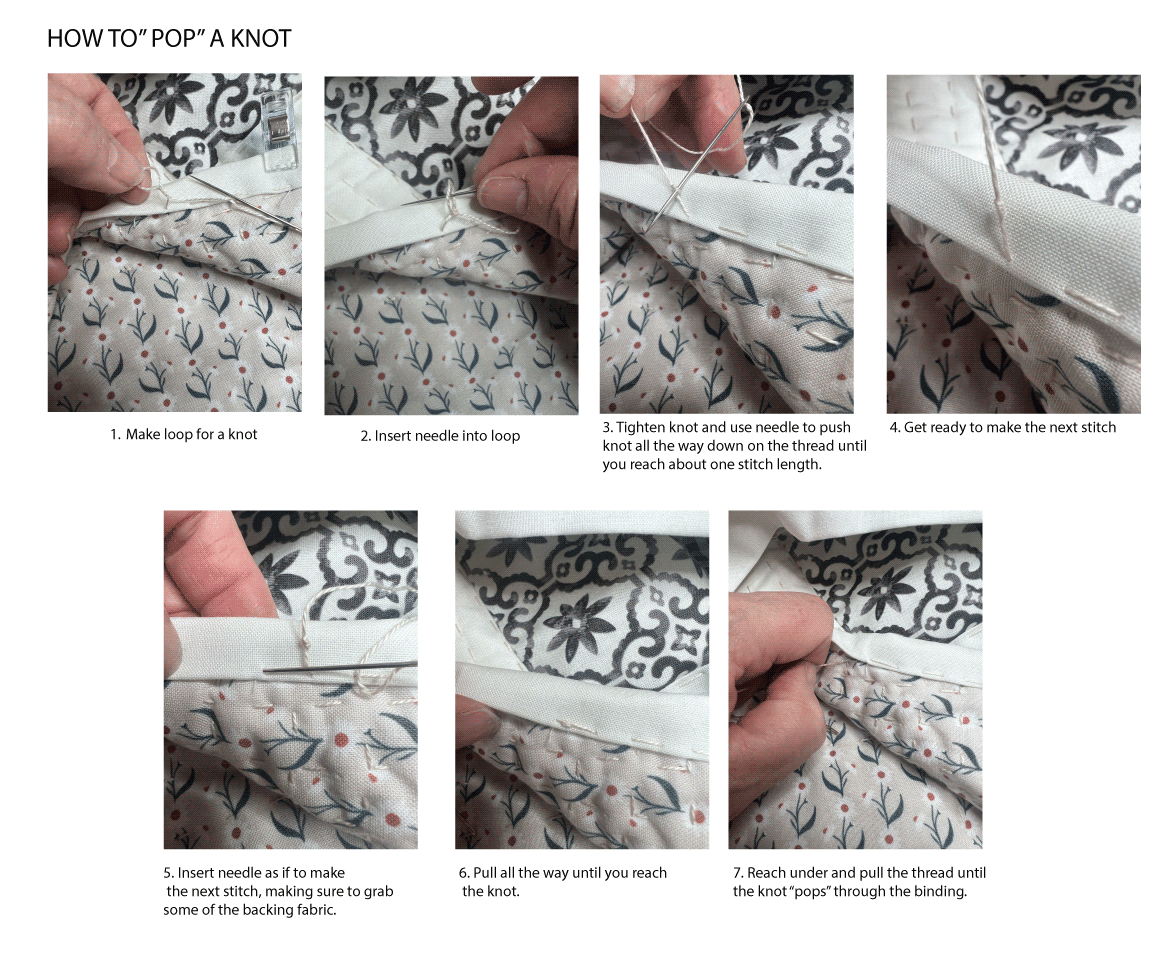
Secure Your Stitches: Knot the thread securely at the end of each quilting line. Pop the knot through the layers to hide it. You can see how to do that in this Suzy Quilts video at the 28 minute mark, or follow my diagram below. I am showing how to pop the knot in the binding, but the principal is the same.
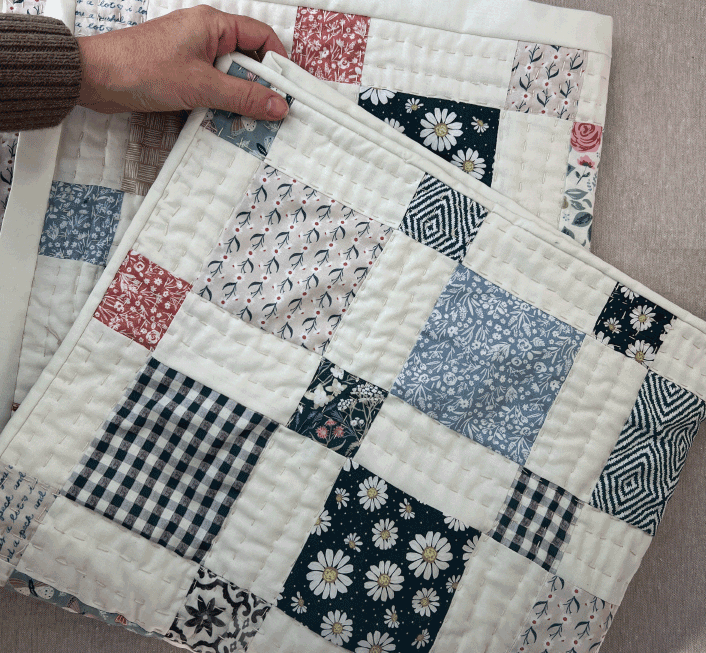
Your quilt should start look something like this:
Trimming the Quilt:
Once all of your quilting stitches are complete, it’s time to trim up your quilt and remove the excess batting and fabric. This will be the final step before applying the binding.
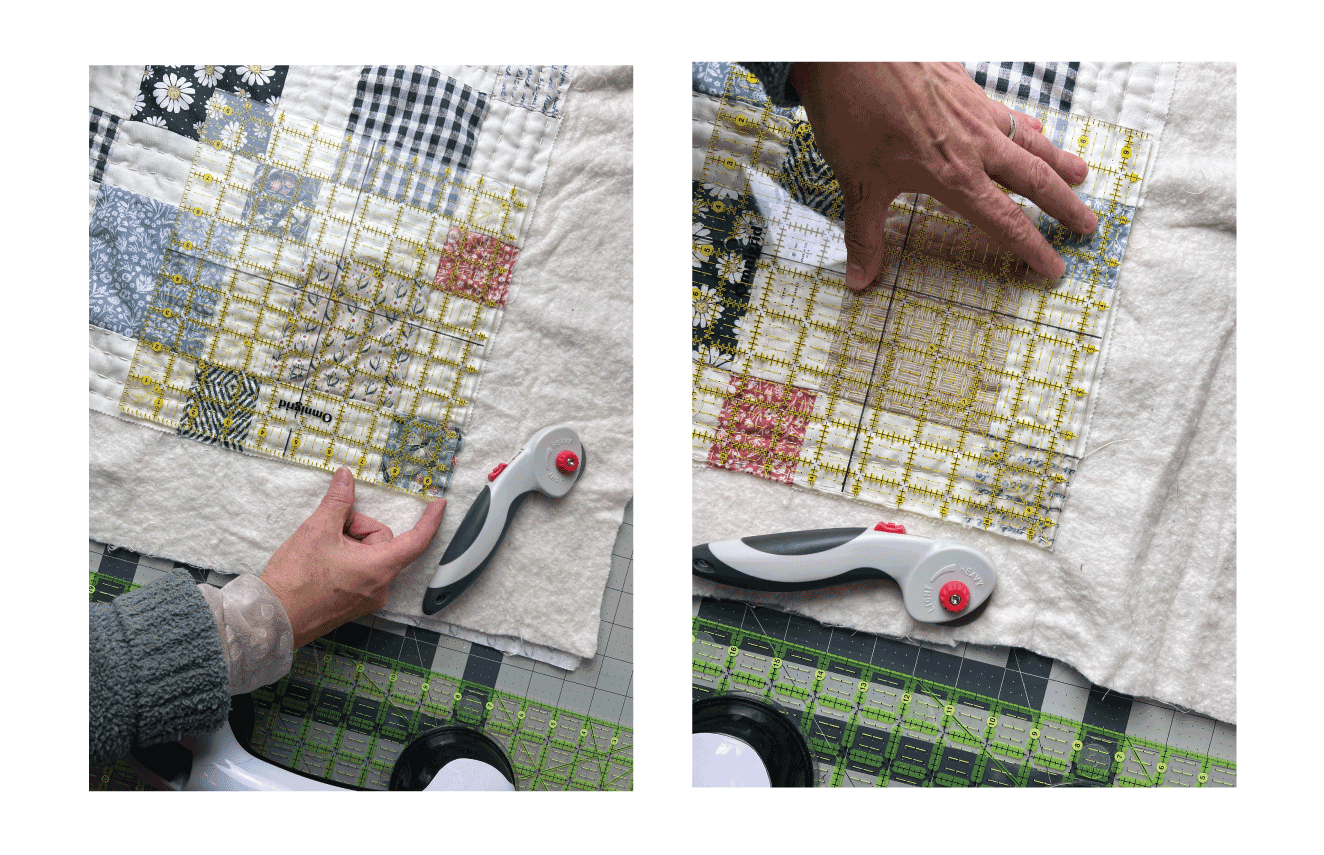
Square Up the Edges:
Use a quilting ruler and rotary cutter to trim excess batting and backing.
I start with the corners, using my largest square quilting ruler.
Once the corners are trimmed, use a straight ruler to connect and finish the cuts on each side.
A large cutting mat makes this task much easier.
Prepare for Binding:
Tidy up loose threads and ensure the corners are neat. Your quilt is now ready for the final step, attaching the binding.
You can take a peek below at the video I made for you.
I sped up the video, please take your time when using a rotary cutter. And make sure your blade is sharp.
Your quilt will not be perfectly square, that is why we are going to do our best to square it up before attaching the binding.
Your trimmed quilt should now look something like this.
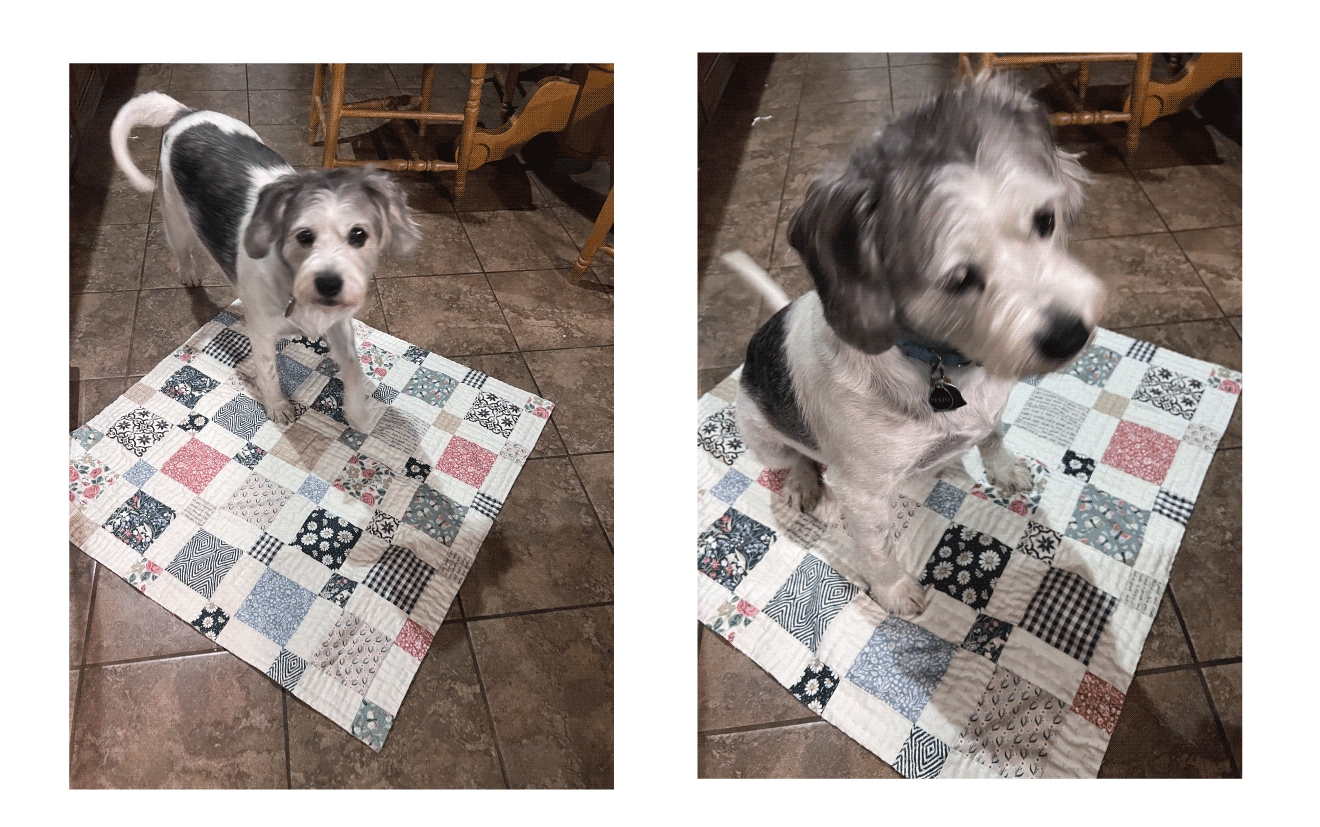
My dog was getting impatient at this point for his blankie. I am making this for him and he knows it🤣)
Making And Attaching The Binding
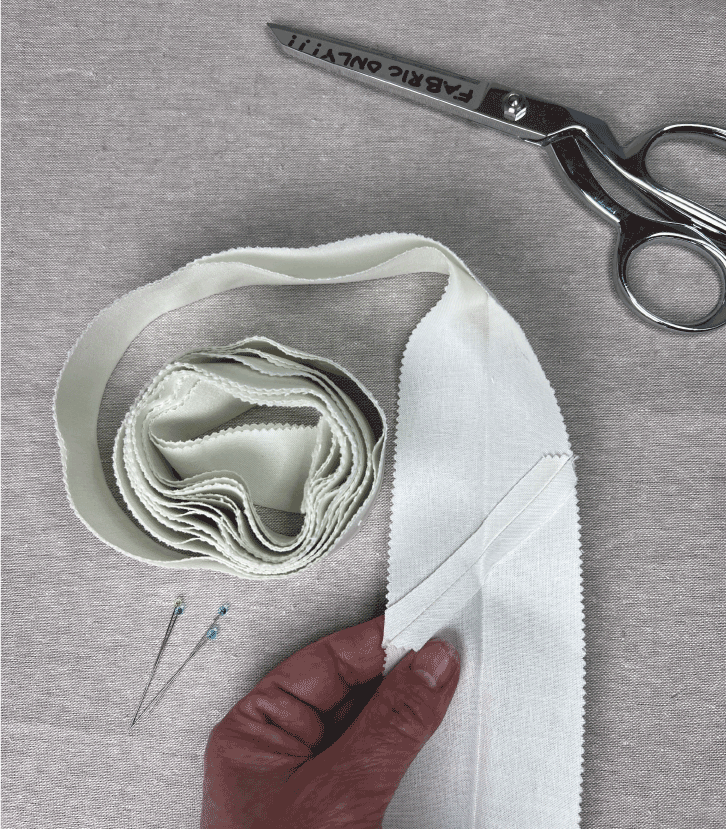
I made my own binding using solid off white precut 2.5” jelly roll, same one I used for the quilt and there was plenty left over. I used 4 strips for this binding.
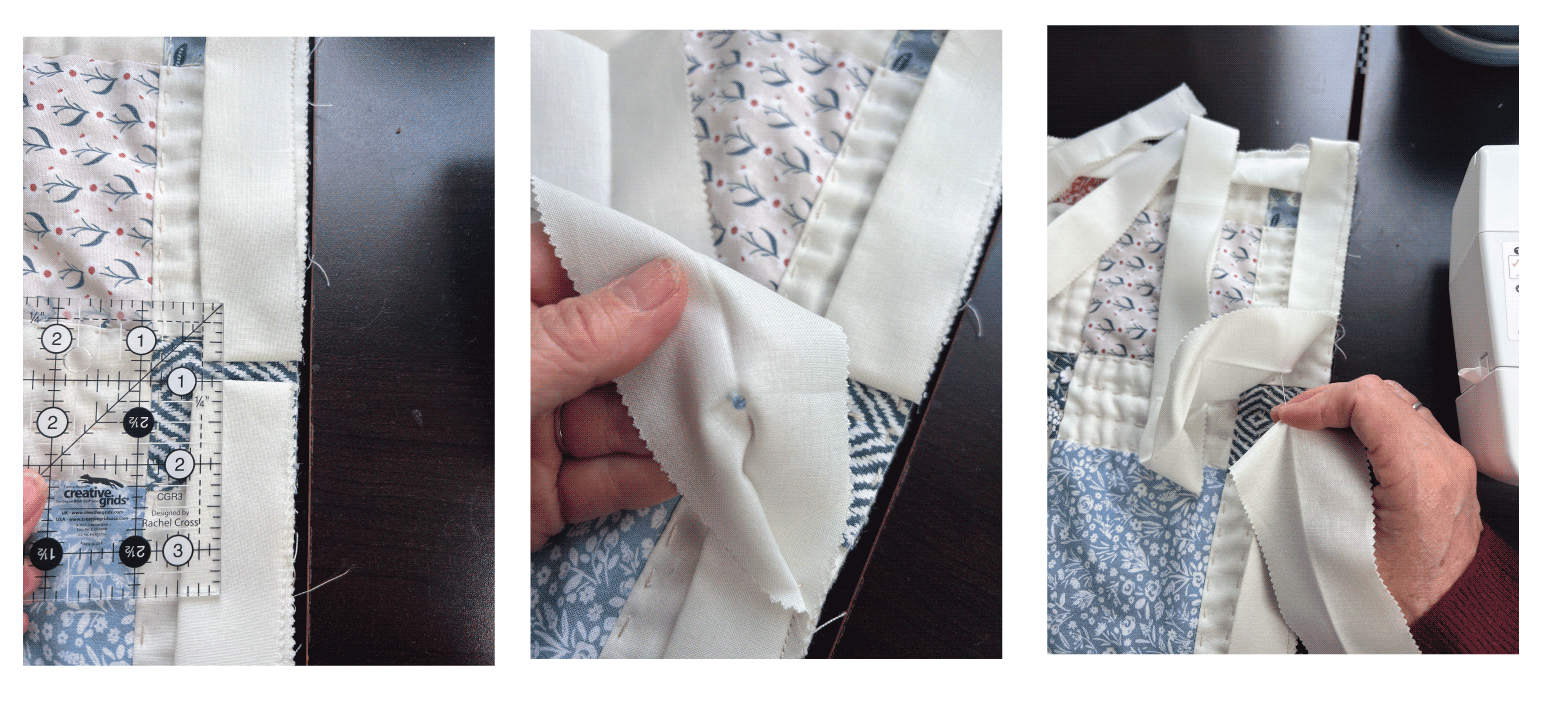
Join Strips
Sew the strips together at a 45-degree angle for a continuous length.
Press and Fold
Press the binding in half lengthwise, wrong sides together, creating a clean, folded edge.
If you want to use other fabric for your binding, you have to do a little math, sorry.
Here is the formula:
Add up the measurements of the all sides of your finished quilt (aka perimeter).
Add 20 inches.
Mine was 128”. Now divide that by 40 (the width of quilting fabric is usually 40-42”) I got 3.2
Round that number up to a whole number = 4
This is the number of strips you need, cut on the width of fabric, to bind your quilt.
Multiply 4 times the width of your binding strips, I’m using 2.5” wide strips. That number is now 10.
Divide that number by 36 to calculate the yardage you will need. So, you will need .28 yards to bind this quilt using 2.5” strips cut on the width of fabric.
Answer= 1/3 yard fabric
If your head hurts from doing the math, use this super handy binding calculator instead, from Quilter’s Paradise. And don’t forget to thank them, they are very nice.
This next step is confusing. I found this tutorial very helpful.
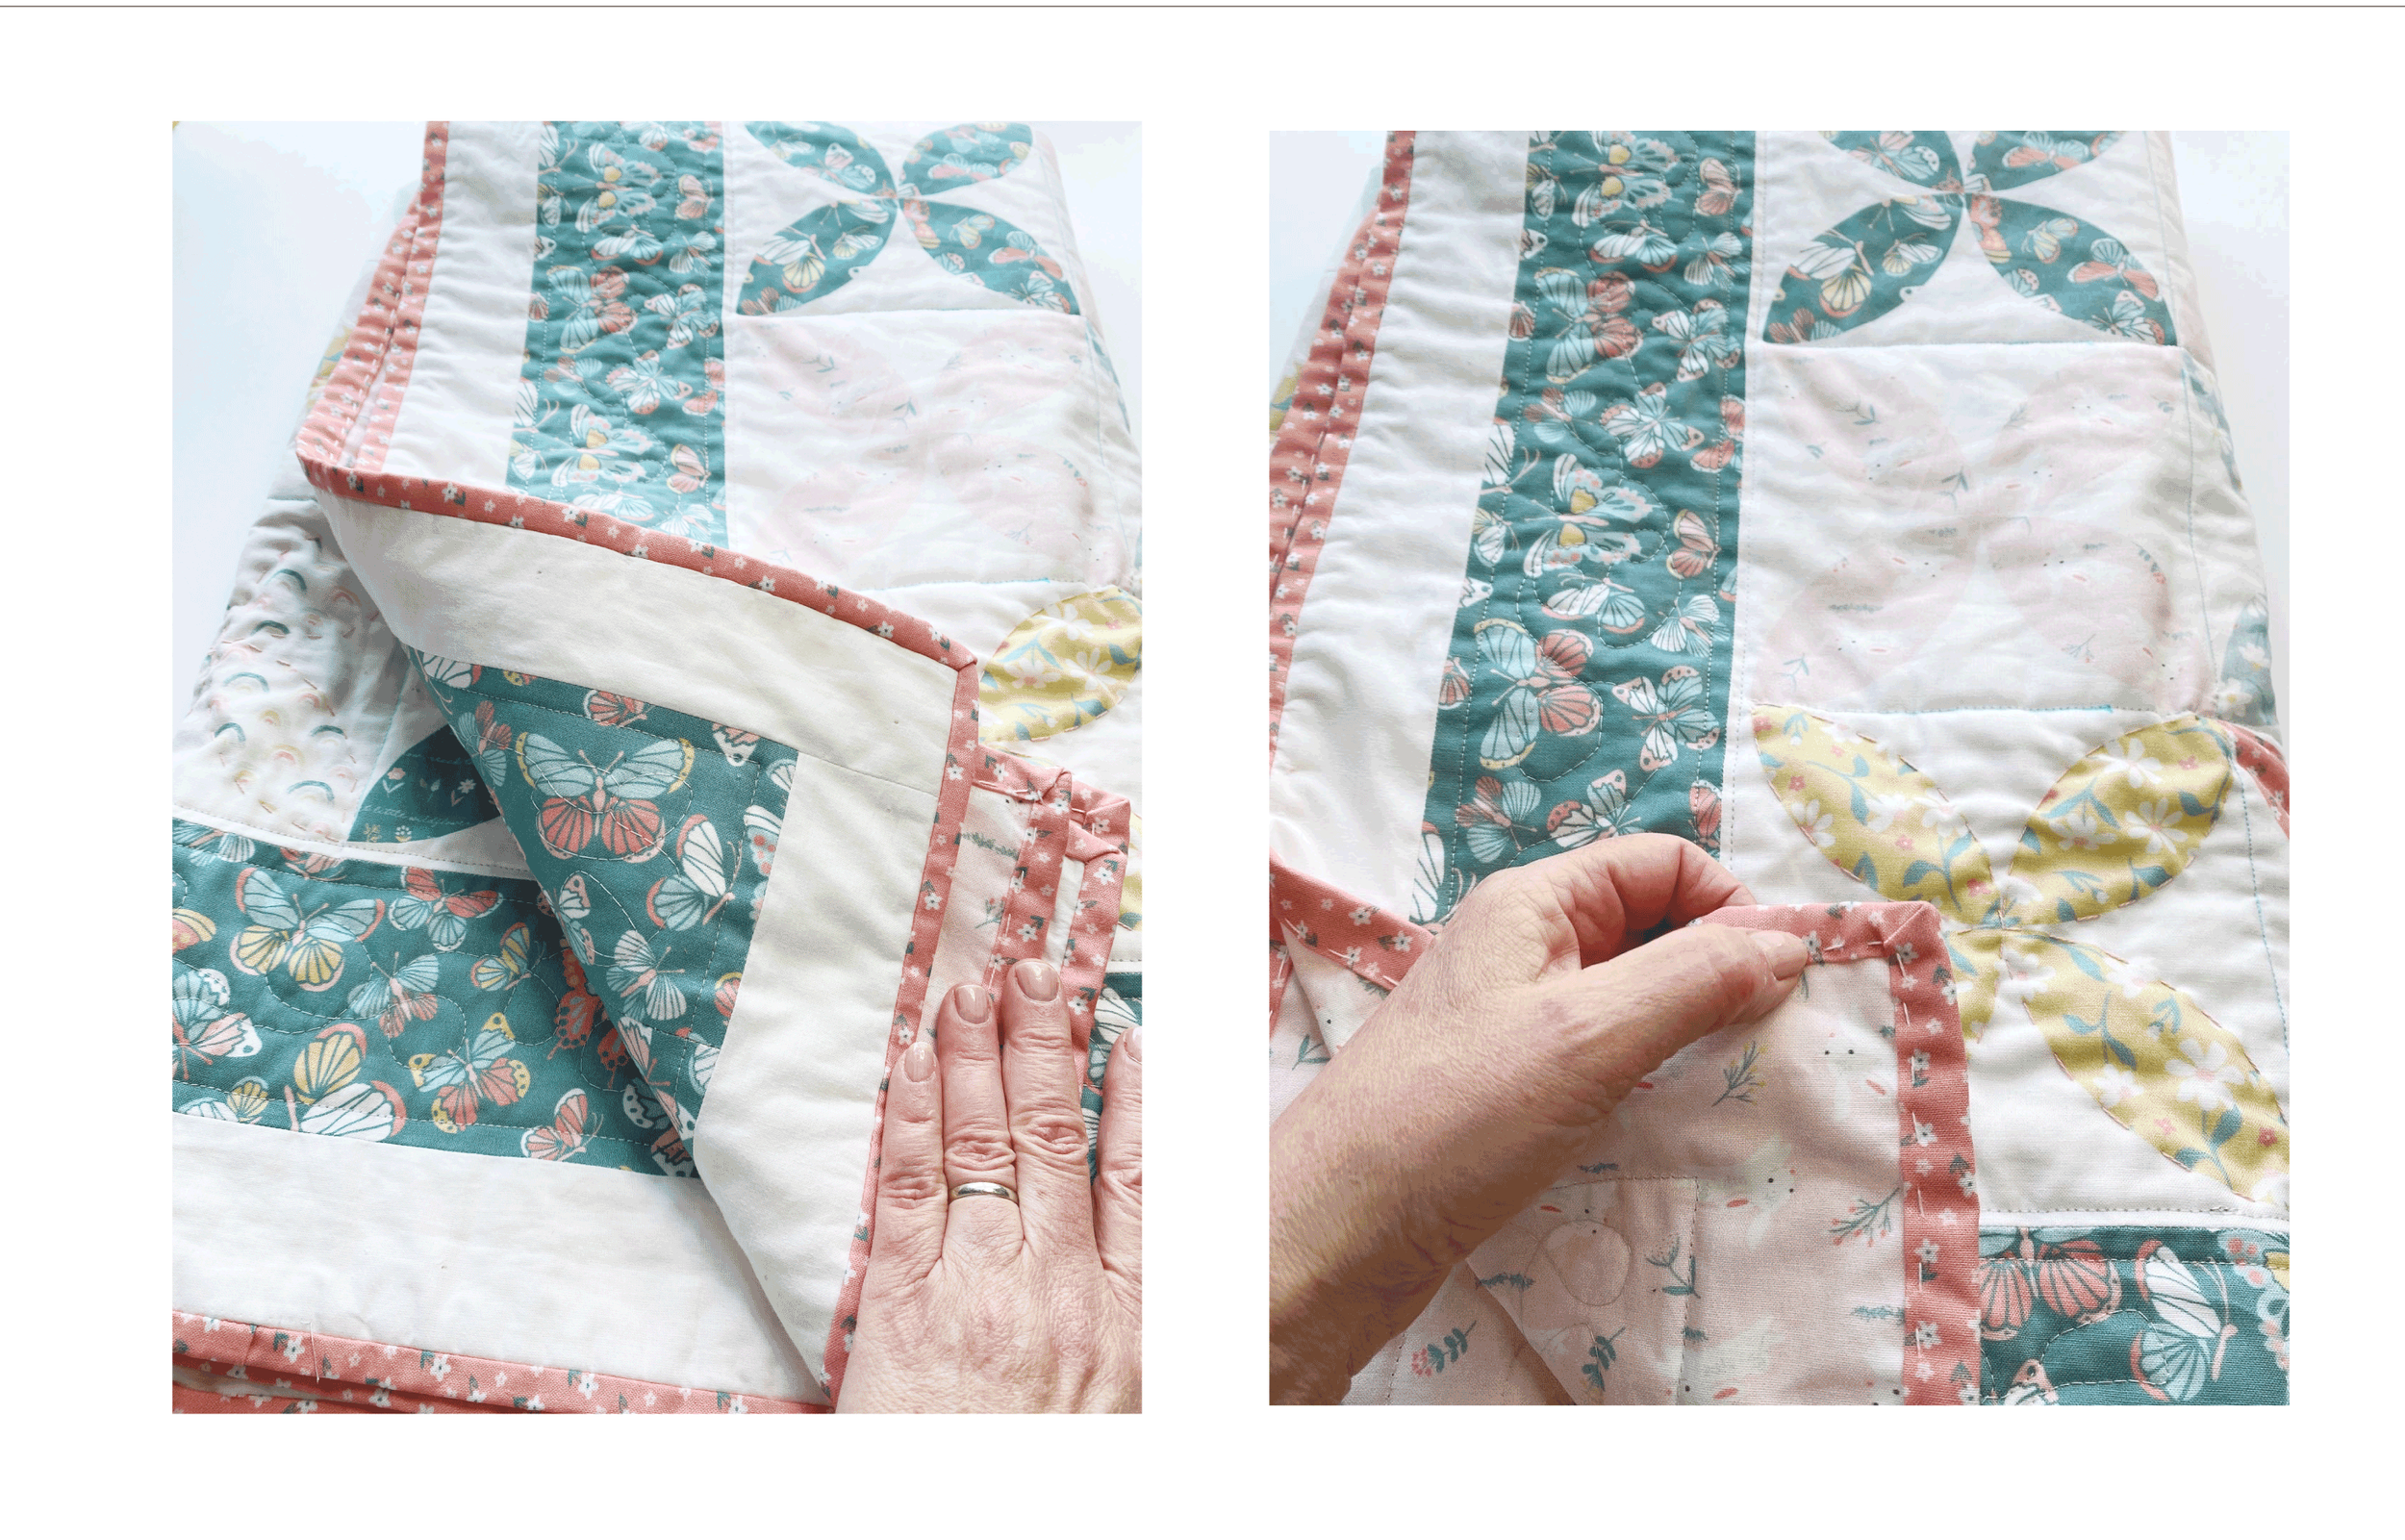
Attach the Binding:

I like to attach my binding to the front of the quilt first, machine stitch, then fold it over to the back and hand stitch it to the back. I have also done the reverse, where the hand stitching is on the front. This is personal preference.
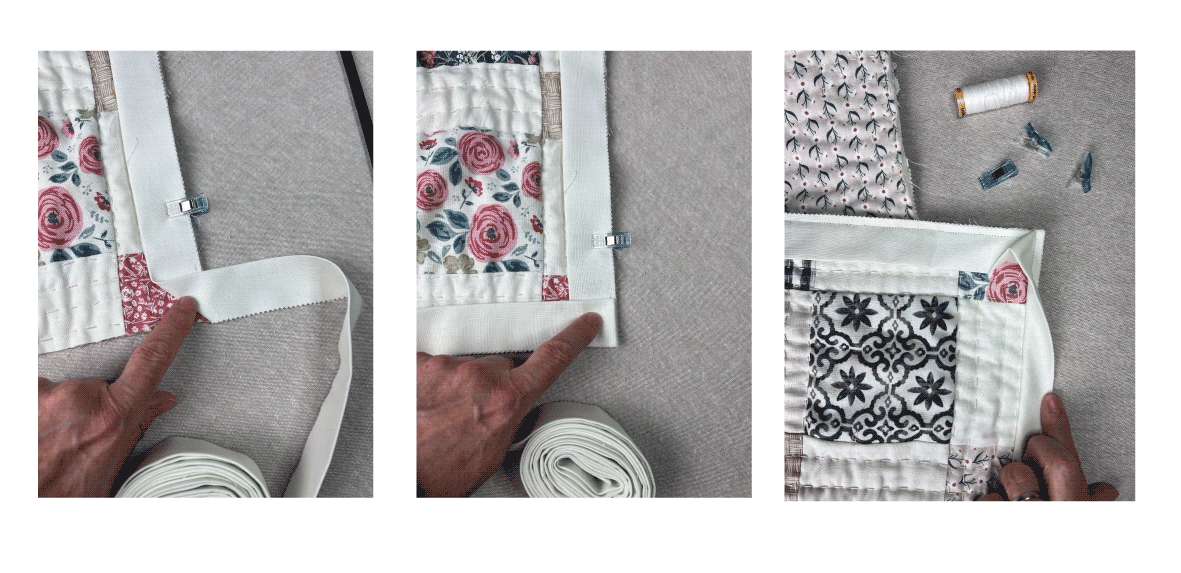
Align the raw edges of the binding with the quilt's raw edges on the front of the quilt, starting in the middle of one side. Use clips to hold in place.
Leave a 10” tail of binding unsewn at the beginning. This will allow for easier joining.
I machine stitch using a 2.5 stitch length, I use a 90/14 needle (the purple ones). I used a generous 1/8” seam allowance but a 1’4” will also work. I use tape on my machine to act as a guide for consistent seam allowance..
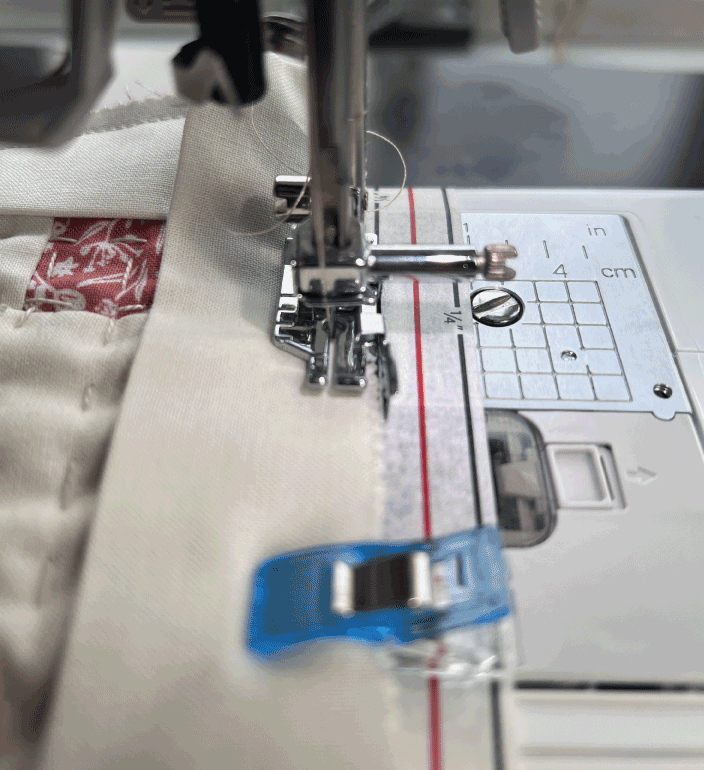
Mitered Corners:
Fold the binding at a 45-degree angle when reaching a corner (see diagram below).
Fold it back down parallel to the next side. Clip in place.
Finish and Secure:
Machine stitch all around the quilt, overlapping the beginning of the binding (follow this tutorial).
I used a 2.5 stitch length and I used off white thread.
This step, attaching the end of the binding to the beginning is very hard to explain. That is why I always refer to Brittany’s tutorial here.
I will attach some of my photos that may help below.
The idea is to attach the ends on a 45 degree angle, just like you joined the strips.
You do this with right sides together. It’s a little tricky to do this, so be patient and watch Brittany’s tutorial several times.
Final Press:
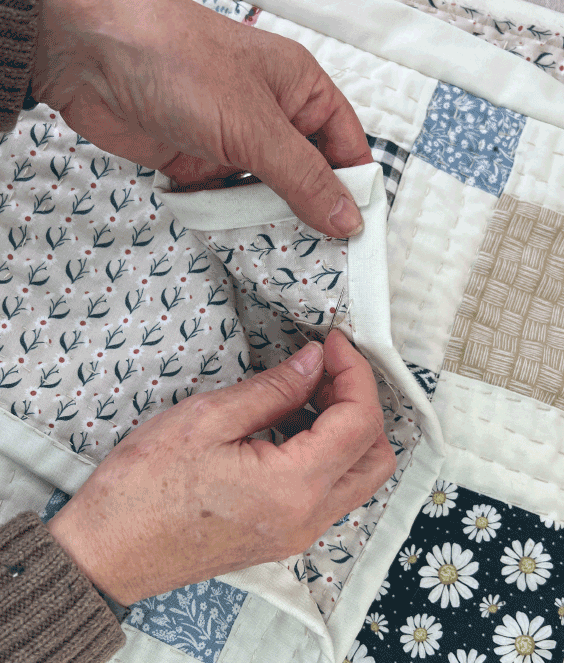
Press the binding away from the quilt and fold over to the back.
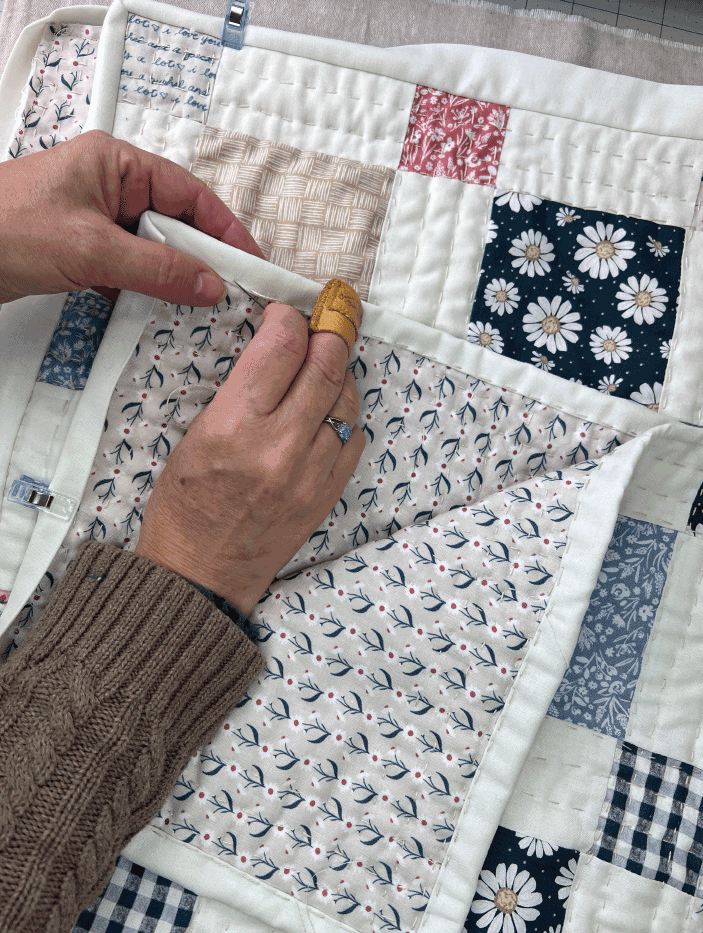
Us a gold eye embroidery needle and DMC #8 Pearl Cotton Thread to hand stitch the binding to the back of the quilt.
Use a thimble to help push the needle through all layers of fabric. I prefer the Clover leather coin thimble.
Use evenly spaced stitches, and use a rocking motion, making sure to grab the binding and the backing fabric. Make sure not to go all the way through to the front of the quilt.
You can use an invisible blanket stitch or as I did, a large visible stitch. I just love the handmade aesthetic of the visible stitches.
Work your way all around and don’t forget to enjoy the process.

You will get better with practice, look at my first quilt hand stitching on the left, and now this one on the right. So much better in a short time.
Progress is better than perfection, every time!
Congratulations! You've completed your hand-quilted baby quilt. Enjoy the satisfaction of creating a beautiful, handmade masterpiece!
Washing Your Quilt
I know this can be scary to put your baby in the washing machine.
Hand washing is the safest way to wash your handmade masterpiece, but let’s get real.
Machine wash in cold water, gentle cycle using a mild detergent.
Use a color catcher if your quilt contains any dark colored fabric. They magically catch any dye that runs.
Tumble dry on low setting, take out when a little damp and hang to finish drying
Storing Your Quilt:
Fold, Don't Hang: Quilts are best stored folded to avoid stretching or distorting the fabric.
Dark, Cool, and Dry: Store your quilt in a cool, dark place away from direct sunlight to prevent fading. Make sure the storage area is dry to avoid mold or mildew.
Avoid Plastic: While it may be tempting to use plastic bags for protection, they can trap moisture and lead to mildew. Opt for breathable cotton or muslin bags instead.
Adding a Label:
"A quilt label is like a signature on a cherished letter—proof that the warmth and care stitched into the fabric have a name and a story."
I haven’t done this yet, but here is a tutorial for you, from Jessica Rose from Quiltd Studio, in case you want to make one.
A Personal Touch: Craft a fabric label to add a personal touch to your quilt. Include your name, the date of completion, and a short message. This label becomes a lasting connection between you and your creation.
Hand or Machine Stitch: Attach the label securely to the back of your quilt using either hand-stitching or your sewing machine. Choose a thread color that complements the label and blends with the quilt.
Permanent Ink or Embroidery: For added durability, consider using permanent fabric ink or embroidery for your label. This ensures your quilt's story lasts as long as the quilt itself.
Share Your Final Thoughts:
As you complete your quilt care rituals, take a moment to reflect on the journey you've undertaken.
Your quilt is more than just a blanket; it's a tangible representation of your creativity and dedication.
I would love to hear about your quilting experiences, storage solutions, and any personal touches you've added. Share your thoughts and pictures in the comments below, and let's celebrate the completion of your quilt-making adventure!
Thank you for joining me on this heartfelt journey. Until we meet again in the world of quilting, take care and keep those creative hands busy!
I’m so proud of you.
XO Maureen
P.S. CAN YOU DO ME A SOLID?
Please pin any of these images to Pinterest so other makers can find it and be inspired.
(If you hover over any of the images you will see the Pinterest red logo in the top left corner, just click on it to pin to Pinterest) Thanks so much👍🏻
Incase you made all the way down here, thanks! You are awesome🤗
And if you missed any of the other posts in this series, here are links to them:
Quick links to all of the blog posts in the series:
In Part 1, we explored the exciting world of selecting fabrics for your baby quilt.
Part 2: We'll dive into the essential steps of cutting fabric to bring your cozy creation to life.
Part 4: We’ll assemble the quilt sandwich and get ready to hand stitch the layers together.
Part 5: We will hand quilt the layers together, then add make and add the binding.
Part 6: We added optiopnal lace to the binding.
Part 7: Bonus queen size fabric requirements for the more adventurous.
XO Maureen